Categories
Pies, Tarts, and Pastries The Book

148. Grasshopper Pie p.772


The recipe

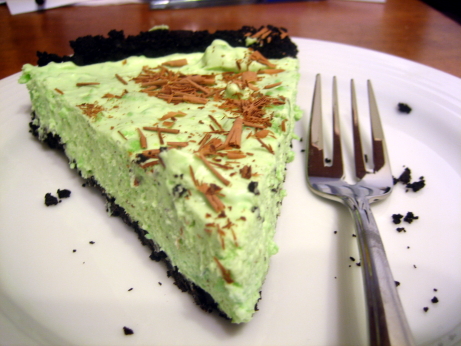
Grasshopper pie was one of the great frustrations of my childhood. It’s a hypnotically enticing green, it’s named after an insect, and it has cookie crumbs in the crust, this is obviously the perfect pie for an eight year old boy. Unfortunately it’s boozy enough to light with a match. My Papa had a fondness for it, and after dinner at big family gatherings my Nana would sometimes bring one out. The adults would sit around laughing, as my uncle would reverently bring a bite to his lips, close his eyes, and make exaggerated moans of pleasure while I looked jealously on. No, no, grasshopper pie isn’t for little boys, there are cookies for you in the kitchen. I could have screamed.

When I got a bit older, I was allowed to try a bite, and much to my dismay, it was foul. Sure it was minty sweet and creamy, but there was something medicinal and disgusting about it. Adults made no sense, alcohol categorically did not taste good, and ruined everything it touched. It was only after a few early experiments with drinking had rewired my brain and set up a pleasant conditioned taste association, that I came around on grasshopper pie. Now, I’m the one faking rapture to make my little cousins jealous.

The pie is easy to make. You start by smashing chocolate wafers into crumbs (get the kids who won’t be eating this pie to help), mix with melted butter, press into a pie pan, and bake. Meanwhile bloom gelatin in cream, add sugar, crème de menthe (green), crème de cacao (clear), and egg yolks. You then whisk this mixture in a double boiler ’till it comes up to 160F, and cool the bowl in an ice bath. Once it’s thickened, fold in whipped cream, and pour the filling into the crust. It then goes into the refrigerator for a few hours, and gets a sprinkling of chocolate just before serving.

My pie was going very well until I got to the cooling the gelatin mixture in a bowl of ice water step. I decided to save time by multitasking and getting the cream whipping in the stand mixer while I stirred the gelatin mixture in the ice bath. Everything was going fine ’till I stopped stirring to see if the cream had reached stiff peaks. By the time I got back to my gelatin it had set. I should have thrown it back on the still hot double boiler, melted it, and then chilled it more carefully, but I didn’t. I figured enough stirring and vigorous folding of whipped cream would do the trick. This was a bad plan. The gelatin mixture stayed in little boozy Jello clumps, and my whipped cream deflated. Because all the colour was in the Jello clumps the pie wasn’t looking very grasshoppery. I resorted to stirring in a few drops of food colouring, which solved things neatly.

I don’t think I could pick a favourite grasshopper pie of my life. There’s not much variation in the technique or the finished product. They almost inevitably taste great. Rich and creamy, with a boozy kick, and brisk hit of mint. The crème de cacao is there in the background, providing that hint of chocolate which works so well with mint.
Next time I’ll remember that gelatin is happy to set for a second time. However, despite my flub-ups, I was quite pleased with this pie. I had to want grasshopper pie for many years before I could try it, and then want to like it for a few more years, now I can say that it was worth the wait.

***ADDENDUM***

At my dining companion’s request, I made this pie again last night. I was very careful not to cool the gelatin mixture too much, and I took it out of the ice cube bath as soon as it began to thicken a little bit. When I mixed in the cream I had exactly the same issue as the first time, chunks of green gelatin in white cream. I solved the problem by putting the whole mess back in the mixer bowl and beating it on high for a minute. Grasshopper pie continues to be delicious, but I’m convinced that the recipe is flawed. I don’t want to start retroactively modifying my ratings, but I think we’re still within the 5 second rule for this post, so I’m downgrading this recipe from 4 to 3 mushrooms.

Categories
Pasta, Noodles, and Dumplings The Book

147. Butternut Squash, Sage, and Goat Cheese Ravioli with Hazlenut-Brown Butter Sauce p.236


The recipe

This dish was my contender in our ongoing series of food battles. They faced off against my dining companion’s lovely beet and ricotta stuffed ravioli, which turned a vibrant fuchsia as they cooked. As is always the case with these battles, we both think we’ve won, because we’ve chosen recipes that suit our moods that night. The only way to solve this is to get an outside expert to come eat with us. My sister loves the idea of judging my food, but she doesn’t eat red meat, which limits her judging potential. This battle was completely meat free, and we just forgot to invite her. She brings it up every time I see her, and I don’t think she’ll forgive me ’till I show up on her doorstep with a ravioli sampler platter.

The ravioli came together easily. You start by roasting a butternut squash, scooping it out, and mashing the flesh. You then brown onion in butter with sage salt and pepper, and mix it into the squash, along with some of the oldest, hardest, and stinkiest goat cheese you can get your hands on. The squash is then distributed among 60 wonton wrappers, and sealed up. You can do all of this ahead, and refrigerate the ravioli ’till dinner time. While the water for the ravioli is coming to a boil, you brown butter with chopped toasted hazelnuts. The ravioli are boiled for a few minutes, and served with the hazelnut-brown butter drizzled on top.

I cheated with this recipe. I decided to do about five times more work than The Book called for, and made my own pasta for the ravioli. Wonton wrappers are just fine, and work quite well for ravioli, but I really prefer fresh pasta for applications like this. The texture is just that much more appealing, and in theory you have much more control of the shape (in practice some of those shapes are a little wonky). Making pasta is a pleasant way to spend an afternoon, and the rolling is exceedingly satisfying. The ravioli were very good, and I think that’s in part due to the pasta. I imagine they’d be fairly similar with wonton wrappers though.

These ravioli were really hearty. They were absolutely delicious, and intensely flavourful. In fact they were so flavour packed that I’d only want to eat two or three of them. They would work best as one course in an elaborate dinner. Roasted butternut squash is high on my list of good things in this world, and it has a wonderful affinity for sage and goat cheese. The flavour pairings in this dish are absolutely right, everything is well proportioned, and it tastes rich and luxurious without being overwhelming.

I could have lived without the hazlenut-brown butter sauce. It was nice and all, but I didn’t find it all that necessary. Preparing the hazelnuts was a hassle, they had to be toasted, and then rolled in a cloth to get their skins off. Unfortunately the skins didn’t quite come all the way off, and flecks of skin ended up burning in my butter, adding unattractive black specks, and a bit of a charred flavour. The ravioli were certainly rich enough without adding nuts, and it was possibly one flavour too many. A little brown butter would have been a nice accompaniment, but the hazelnuts were overkill.

I was very well pleased with my entry to Battle: Ravioli. I’d absolutely make these again, and I’d probably make a double batch just to stash some in the freezer.

Categories
The Book Vegetables

146. Sweet Potato Parsnip Purée p.584


The recipe

This dish seemed like a winner, but ended up a real disappointment. I’m a fan of sweet potatoes, and I adore parsnips, so what could possibly go wrong? It’s about a simple as a recipe can get, you just simmer chunks of sweet potato and parsnip ’till they’re tender, and run them through the food processor with butter, milk, brown sugar, salt, and pepper.

Looking at the recipe I thought the brown sugar would bring out the essence of the sweet potato and highlight some of its deeper flavours. I didn’t worry about extra sugar because the sharp turnipy bite of the parsnip would be there to pull the dish back from the saccharine edge. I couldn’t have been more wrong. The already sweet enough thank-you-very-much potatoes ended up cloying. The parsnips added a hint of a counterpoint, but not nearly enough, they did lend prominent overtones of bark and wood chips though. The recipe called for light brown sugar, which didn’t have enough molasses to do much for the flavour.

Probably the worst part of the recipe was the texture. The time in the food processor reduced this to a gummy coating paste. Every bite left me with the feeling of peanut butter glued to the roof of my mouth. I made the mistake of leaving some of the dishes for the morning, and the gunk in the food processor set up into a form of organic concrete. Add the weird, almost yellow, kinda orange, but definitely neon colour palate of this dish, and I was ready to be done with it.

I had half my portion on the night we made it, and tried to get through a bit more over the next couple days. Eventually I gave up and let it moulder in the fridge ’till I could throw it out in good conscience. Oddly, the Epicurious reviews for this recipe are fairly positive, so maybe I’m missing something. Mashed sweet potatoes are wonderful things, but from now on I’ll roast my parsnips and serve them along side.

Categories
Beef, Veal, Pork, and Lamb The Book

145. Cider Braised Pork Shoulder with Caramelized Onions p.476


The recipe

I love to braise. It’s almost worth suffering through the interminable and bitter winter of Montreal to do it. Of course you could braise all year round if you really wanted to, but somehow simmering meat for hours in the middle of July just doesn’t sound like a good idea. Braised meats are delicious, so I’ve tried letting someone in the kitchen at a restaurant suffer through the heat, and ordered it. Unfortunately it’s just too heavy to be enjoyable, and the process of doing it myself is one of my favourite parts. You really need a miserably blustery day to truly appreciate the joys of a good braise. I love the side benefits of the whole house smelling wonderful for a day, and the comforting knowledge that dinner is getting itself ready, and the more you ignore it the better it will be. With our oil heating, leaving the stove on is also a pretty economical way to heat the house.

You can’t beat a braise for thrift either. You can keep your precious tenderloins, give me the gnarliest, toughest, and cheapest cut of meat you can find, and it will turn to gold after a few hours with Le Creuset. It’s amazing to see this awful slab of meat transformed. The fat renders, and gets skimmed away, the connective tissue dissolves and become that elixir of mouth-feel, gelatin, and even the toughest cuts yeild to a fork. Those braising bits have so much more flavour than the quick searing cuts of meat, it just takes a little time to coax it out.

This recipe starts with a skin-on picnic ham. You score the skin, and insert cloves of garlic into the meat, add salt and pepper, and then brown it thoroughly in a heavy pot (cast iron is your friend). Once the meat is browned, you remove it, and sauté a whole whack of onions in the pot. When the onions turn golden, you add unfiltered apple cider, and the meat back to the pot. Then you seal it up, stick it in a 325 oven, and walk away for the next three hours or so. When you’re ready to serve, you remove the meat, and reduce the braising liquid to two cups. If the lid of your pot doesn’t have an extremely tight seal this will have happened naturally.

You can serve the pork right away, but it’ll taste better if you let it cool in the braising liquid, refrigerate it overnight, and then serve it for dinner the following day. This also makes defatting the sauce easy. The recipe doesn’t call for it, but I think it’s a necessary step. There’s a huge amount of fat on a pork shoulder, and most of it melts into the sauce. Even if you don’t have time to cool it it’s worth letting the liquid sit, and skimming part of the fat away. That’s one of the recipe’s biggest weaknesses. I defatted my sauce, but I don’t think I would have enjoyed it nearly as much if I’d followed the recipe exactly.

Recipes are never very specific about how much you should brown meat for a braise. Older books spout that nonsense about sealing in flavour, but really you’re building flavour. The darker the meat gets, without burning, the more flavourful your braise will turn out. There’s nothing at all wrong with your browned meat looking more than a little black, just avoid billowing clouds of smoke.

Braised pork shoulders are always good, it’s nearly impossible to mess a recipe like this up. This particular braise was minimalist, with just a few ingredients. I think it could have easily accommodated another flavour, a sprig of thyme would have done wonders. It was also a little unbalanced, both the onions and the cider were very sweet, and a little vinegar would have been welcome. The texture was excellent, succulent and falling apart, with a thick hearty sauce to go along with he meat. It made quite a nice dinner, but it was an outrageously good sandwich the following day.

The recipe’s biggest weakness was the skipping of the defatting step, other than that I have only minor quibbles. If you’re OK with sweeter meat dishes, leave it as is, if not go with some cider vinegar. I’d add herbs depending on my mood, it’s very nice even without them. If you don’t braise a lot, this recipe is certainly worth trying. And, if not this recipe, then some recipe, get out there and eat low on the hog.