Categories
Pies, Tarts, and Pastries The Book

160. Cranberry Walnut Tart p.786


The recipe

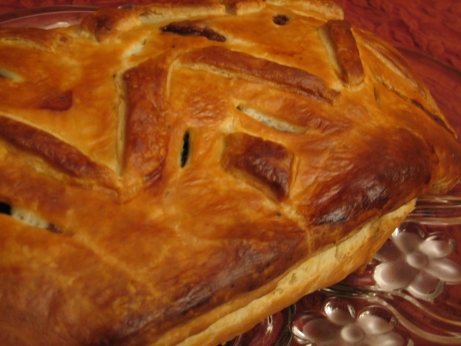
Cooking is a learning process, and a lot of lessons just need to be learned the hard way. There are a host of excellent kitchen habits that food educators are desperate for us to get into, such as, reading the recipe all the way through, verifying that you have all the ingredients, doing things that can be done ahead ahead, getting your mise en place, and cleaning as you go. These are wonderful, labour saving, better for you in the long run, habits. Unfortunately it takes a fiasco for me to really internalize any of those teachings.

Today’s lesson was “Don’t assume, you’ll make an ass out of u and me”. I’d already learned the read the recipe all the way through lesson, so it was time to screw up the checking that you have all the ingredients you think you have step. I made a special trip to the grocery store to get the stuff for this tart, and picking up corn syrup wouldn’t have been a problem, but I took it on faith that somewhere in the depths of the pantry a sticky bottle of light corn syrup was waiting for me. I was wrong, in a two cook household you can never trust that the pantry fairies haven’t come along and wiped you out of cream of tartar. For the record, acceptable substitutions for 1 cup of light corn syrup are 1 cup of dark corn syrup, 1 cup of treacle, 1 cup of liquid glucose, 1 cup of honey, or 1 cup of granulated white sugar (increase the liquid in the recipe by 1/4 cup). You’ll notice that 1 cup of maple syrup is not on that list. I knew that I should really make a simple syrup as a stand in, and two seconds of googling would have turned me on to honey, but I went with maple syrup because I’d failed to heed the “do what can be done ahead ahead” lesson, and the guests were coming much sooner than I was ready for.

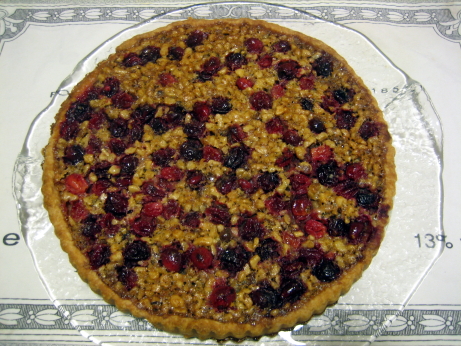
For this tart I baked off a batch of Sweet Pastry Dough, then whisked together eggs, brown sugar, maple syrup instead of corn syrup, butter, salt, and vanilla, then stirred in chopped walnuts and cranberries which i forgot to chop (I was frazzled). I baked it for half of the recommended 45 minutes because it was starting to burn.

Part of the filling boiled over the sides of the pan and onto the bottom of the oven, and some got between the crust and the tart pan. That left a lot less filling in the actual pie shell, so it began to dry out. Maybe if I’d chopped the cranberries as as I was supposed to they would have released more juice, and kept the caramel saucy. The pie was really sticky and thick, hard to cut, hard to eat, and didn’t taste all that great. The cranberry-walnut-caramel combination should have been a winner, and it might well have been if I’d followed the recipe properly. The people on Epicurious seem to like it well enough.

As a pie this really wasn’t great, but it worked out well as a life lesson. Today I learned that just because I’ve had an ingredient at some point doesn’t mean I still have it. I’ve also started to think about organizing the pantry so that it makes some kind of sense. In future, if the cook’s note at the bottom says that the recipe can me made a day in advance, I’ll consider availing myself of that. Sometimes it takes several painful repetitions for a lesson to sink in, but I’m begining to appreciate the fact that the Gods of pastry aren’t shy about smiting those who play fast and loose with the recipe. I always feel bad when I give a recipe a poor rating when it was at least partially my fault, but too bad, The Book doesn’t actually have feelings that I can hurt. I give my performance as a cook here 1/5 mushrooms, but the tart fares a bit better.

Categories
Pies, Tarts, and Pastries The Book

124. Berry Tart with Mascarpone Cream p.777


The recipe

I was impressed with this tart, it’s very simple, beautiful, and delicious. I’m not fond of precious pastry bag tricks, or marzipan statuary on my desserts. I prefer the natural good looks of fruit, or decoration that’s an extension of the dessert making process. I tend to bake cakes, dust them with icing sugar, and call it a day. In large part this is because I’m not fond of icing. I’ll often eat the cake out from around the icing if it’s too sweet. I’m OK with whipped cream based icings, and some butter creams, but super-sugared toppings like penuche just aren’t my thing. The beauty of a summer tart is the casual elegance, it’s effortlessly gorgeous, and usually looks and tastes better than a tortuously composed winter-time confection.

The recipe was very simple. It starts with Sweet Pastry Dough, rolled out between sheets of wax paper, and baked with pie weights. It’s filled with a whipped mixture of mascarpone, cream, and sugar. It’s then topped with strawberries, raspberries, blueberries, and blackberries which have been coated with marmalade and berry liqueur. As I mentioned in the write-up for the dough, I had some problems getting it to roll nicely, but it was still quite tasty. The mascarpone cream was excellent, it added body and richness with a very subtle tang, and not too much sweetness. The berries were allowed to carry the dish, they provided the bulk of the sweetness, a nice boozy accent, and all of the visual appeal.

My only complaint with this recipe are the instructions for the berries. They’re put in a bowl, covered with melted marmalade and liqueur, and gently stirred together. I did my absolute best to stir very very gently, but the delicate blackberries and raspberries suffered for it. Next time I’d put the berries on the tart and drizzle them with the glaze. You might not get as thorough a coating as you’d like, but it’s a real shame to damage perfect summer fresh berries. Incidentally, the recipe calls for a dark berry liqueur like blueberry, blackberry, or creme de cassis. I was convinced we had creme de cassis the back of the liquor cabinet somewhere, but it turns out that belonged to an old roommate. I used Grand Marnier instead, and it was delicious. No doubt Grand Marnier is sweet, but it’s got a much more pronounced Cognac edge than many other fruity liqueurs. I welcomed that firey addition to the tart, while a more syrupy liqueur might have pushed it in the wrong direction.

I was extremely happy with this dish, it was simple, delicious, and seasonal. It hinges on amazing fresh berries, I don’t think a winter time replication with frozen fruit would work out. I’m watching giant fluffy snowflakes drifting down outside my window right now, and it’s making me long for the amazing bounty of fruit I got to enjoy in August. This is a quintessential summer tart, a thousand variations are possible, but I could happily stick with this version for the rest of my life too.

Categories
Pies, Tarts, and Pastries The Book

123. Sweet Pastry Dough p.791


The recipe

I should state at the outset that I’m a pastry neophyte. Before I started The Project, I think I’d made two pies in my life. Sure, I baked stuff in pie shells, but I always picked up the Tenderflake pre-made ones, and figured it was good enough. I don’t really have a knack for pastry, but I’m working on it. This is the inaugural entry for the Pies, Tarts, and Pastries chapter of The Book, so hopefully my pastry skills will improve as I work my way through it.

This pie dough is a sweetened and butter based. It gets used in all sorts of other recipes in The Book. I definitely prefer a sweetened dough for dessert pies and tarts. My mother is a rolling pin virtuoso whose pies always turn out perfectly, but she uses the same lard based dough for all her recipes. We have tourtière (a spiced meat pie) every Christmas, which I adore. I particularly like the way the crust is infused with the meaty filling’s flavour. However, when summer comes around and she starts baking up fruit pies using the same dough, I can’t help but imagining the taste of the meat filling along with the crust. Tourtière innards and strawberries aren’t destined to be the next great taste sensation. She recently started adding sugar to her dough for sweet pies, and it made a world of difference. Somehow a little sugar gets rid of the yuletide association, and the pies become pure summer.

The ingredients and method for this dough are pretty standard, combine flour, sugar, and salt, then blend butter in until you’ve got pea sized lumps in a sandy mixture. Then egg yolk and a bit of water are incorporated, until the dough barely holds together. The dough is then divided up, smeared once with your palm, and refrigerated for an hour.

I had some trouble with rolling this dough out. I’ve made it twice, the photo above is the most recent attempt. You can see the scraps to the left, which were probably 40% of the pie dough. I had a really tough time getting it to roll out evenly, and small cracks at the edges developed into big fissures as I was rolling. It was actually fairly easy to work with, and I think my problems were a matter of technique rather than the recipe. The first time I made it was much more of a fiasco though. I made it in late August, on a day with 95% humidity, and it didn’t go so well. Here’s a photo of the crust after baking. 123_sweet_pastry_dough_p791_bad_attempt.jpgYou can see that I had to do a lot of patching before I even got the dough into the oven, and small cracks I’d missed developed into chasms once baked.

The flavour of the dough is excellent, but the texture isn’t ideal. Butter doughs are usually tender, but not flaky. Using a mixture of lard or shortening with butter should give a flavourful dough with great texture. The Book’s Basic Pastry Dough takes this approach (without sugar), and I’m looking forward to trying it. This dough was perfectly fine, it tasted good, and the texture was totally acceptable, but I don’t think it’s the definitive sweet pastry dough. Perhaps as I make and remake it for all the recipes that call for it I’ll get the technique down. For now it’s very serviceable, and I’m content to keep using it.

Categories
Beef, Veal, Pork, and Lamb The Book

77. Twenty-First-Century Beef Wellington p.418

The recipe

There’s not much left to say about this dish. I’ve described it pretty thoroughly in the posts for Cilantro Walnut Filling and the Sour Cream Pastry Dough . Those two recipes are the main ingredients for the final Beef Wellington recipe. A nice big beef tenderloin seasoned with salt and pepper is thoroughly browned, covered in the cilantro walnut filling, and then wrapped up in the sour cream pastry dough. The dough is decorated with cut out bits of pastry, given an egg wash, then the whole thing is baked.

As I said in their respective posts, the dough was a real winner, while the filling was just OK on it’s own, and very out of place in a beef wellington. I mildly overcooked the tenderloin but it was still excellent. Filet mignion and a perfectly baked crust were more than enough to make up for the filling. The final dish was tasty, but I really missed the mushroom of the traditional Wellington. I could live without the big slice of pâté though.

Beef tenderloin can be a real hit to the wallet, at higher end butcher shops a whole tenderloin sells for close to $100, which is really not in line with my financial reality. I managed to find a commercial cut tenderloin (PSMO) for one third the price. It was good quality meat (not organic, local, or in any way fancy, but perfectly nice), but it required a little bit of work on my part. A commercial cut tenderloin comes with a good deal of silver skin to be removed, as well as an extra little side muscle best used for something else. I can’t say that peeling off silver skin is much fun, but it’s absolutely worth doing for the price difference.

This updated beef Wellington didn’t really improve on the original, and other than having beef in a pastry had very little in common with beef Wellington. The pastry and beef were top notch, while the filling was somewhat lacking. I would use this recipe again, but I’d go back to a more traditional filling. I don’t regret making it, but I’m not itching to have the twenty-first century version again.

Categories
Beef, Veal, Pork, and Lamb The Book

75. Sour Cream Pastry Dough p.419

The recipe

This is the crust for Twenty-First Century Beef Wellington. It’s folded over a browned beef tenderloin, covered in Cilantro Walnut Filling, and baked. It’s a very simple dough, made with flour, butter, sour cream and a dash of salt. It’s brought together, then smeared to distribute the fat, and chilled for a couple of hours before rolling.

The dough was exceptionally strong before baking, it put up with a lot of folding, and pinching, and crimping, without tearing or stretching out too much. It rolled out easily, and stood up to the fillings during baking. Between the filling and the meat juices this dough was asked to encase a lot of liquid, and it did an admirable job. Not a drop leaked out, and the bottom of the crust remained crisp.

The final texture was flaky on the outside, and rich and moist on the inside. The sour cream gave it a bit of a bite, which I really appreciated. I was thoroughly impressed with how beautifully it browned up. The central problem of beef wellington is arranging things so that the pastry is nicely browned at the same time as the meat is medium rare. I took the wellington out when the beef was done, and just hoped for the best on the crust. As it happens I turned my back for a bit too long and ended up closer to medium than medium rare on the beef, but the crust was absolutely perfect.

The crust was probably my favorite part of the final wellington recipe. It tied the flavours of the meat and filling together, and had a wonderful crisp – tender texture. You could replace the tenderloin and filling with all sorts of things in this recipe. The dough would be great filled with vegetables, or fish. It would also be a delightful dough for a savory pie. Maybe I’ll use it for a tourtiere at Christmas.

Categories
Pasta, Noodles, and Dumplings The Book

58. Pasta Dough p.209

Sorry, no recipe.

This is a standalone recipe, but its result is an inedible dough. There’s really not much to it, mix together flour eggs salt and a bit of water in a food processor, then add water by drops until a dough just forms. Kneed for 15 seconds, and leave it alone covered for a hour. A good recipe to have on hand, and a lead in to many other recipes, but on it’s own it’s just dough.

I’d never made pasta before, and the eventual rolling and cutting it into shapes part was really fun. I went a bit hog wild with the pasta roller and made streams of fettuccine, ravioli, and dumplings after I learned how much I enjoyed it. The recipe worked reliably and produced some fine tasting pasta. The only trick was to cover it well while it rests. It’s a very dry dough, and if it’s left in the air for too long it drys and cracks when you try to roll it.

I don’t eat a lot of pasta, and when I do it’s usually because I want something simple and fast. There’s something very appealing about forcing yourself to slow down and appreciate the steps that go into pasta. The textural differences between fresh and dried pasta are fairly subtle, at least to me, but as it’s a good time I say why not make it yourself? The real advantage of homemade is in stuffed pastas. Making your own ravioli is worth every second of effort.

This dough was a gateway to all kinds of good dinners, it’s easy, and it’s reliable. It’s not exciting, but it doesn’t need to be.