Categories
The Book Vegetables

192. Baked Breaded Acorn Squash p.579


The recipe

Here’s a very simple and quite cool looking preparation for acorn squash. All you do is mix bread crumbs, thyme, salt, and pepper in a bowl. Melt butter in another bowl, and dip slices of acorn squash first into the butter, then coat with the bread crumb mixture. You then bake the squash slices for about 20 minutes.

The Good: I wouldn’t have guessed that acorn squash and thyme had such an affinity for one another, that was a very pleasant surprise indeed. Baked bread crumb toppings are generally good things, and this was no exception.

The Bad: I didn’t have any regular bread crumbs, and decided panko would be an acceptable substitute. I didn’t consider that because panko is so much lighter and has much more surface area than regular dry bread crumbs, it cooked much faster. When the recipes recommended 20 minutes in the over were up my bread crumbs were starting to burn so I had no choice but to pull the squash out. Unfortunately the interiors of the squash were still quite firm. I had to nuke the squash to get it to soften up. The bread crumb topping survived the trip through the microwave better than I would have expected though.

The Verdict: While the panko substitution was my fault, the cooking time for this recipe was too short, and that’s The Book’s fault. The flavours were excellent, and it was a very simple way to make an impressive looking side dish. I’ll certainly be making this again, but I’ll stick a little closer to the instructions next time.

Categories
Hors D'Oeuvres & First Courses The Book

142. Oysters Rockefeller p.52


This recipe from Epicurious is similar to The Book’s version, but the linked recipe has slightly different proportions, and makes twice as much topping. I didn’t read the recipe very thoroughly, and used little Malpeque oysters for the recipe, instead of the “large” oysters the recipe called for, so I had more than enough topping.

We used to get Oysters Rockefeller about once a year as children. My parents would pick up a case of Oysters for themselves, or get a few cases and invite friends over for an oyster party. Us kids were totally grossed out by raw oysters, and dared one another to try slurping them. Inevitably one of us would take the bet, and then gag on the slippery salty oyster, and spit it into the sink. My parents quickly realized this game was a waste of precious oysters, and started making Oysters Rockefeller for us, which we devoured. As I grew up I came around on the raw oyster, and ended up preferring them raw with just a little squeeze of lemon juice, or a dash of hot sauce.

During my late teens and early twenties I was a volunteer firefighter, and our department had an oyster and beer bash every fall. Mostly people came to the party to shuck and slurp raw oysters at long tables all night long, but we prepared oyster soup and oysters Rockefeller too. I would spend the afternoon shucking oysters and saving the prettiest shells. I never got the department’s recipe, but they did an especially fine version of the oyster Rockefeller. Even though I prefer my oysters without adulterations, I certainly wouldn’t say no to one.

Unfortunately this recipe doesn’t live up to either my Mother’s or the department’s version. Using the wrong oysters threw the whole recipe out of whack, but I don’t think that’s the whole story. You start by making a mixture of chopped Boston lettuce, baby spinach, scallions, parsley, celery, garlic, and bread crumbs. You then wilt this mixture in a skillet with butter, and add Pernod, anchovy paste, cayenne, salt, and pepper. The mixture is allowed to cool, while you crisp and crumble some bacon. You then add an oyster and some of it’s liquor to a cleaned oyster shell, top with some of the vegetable mixture, bacon, and more bread crumbs. The oysters then get stabilized on a bed of salt crystals, and go into a 450 oven for 16 – 18 minutes.

My main criticism of the recipe is that there were way too many bread crumbs. The crumbs soaked up all of the oyster liquor, and overwhelmed the oysters with their sandy texture. Even if I’d used gigantic Pacific oysters that would have been a problem. Using the smaller oysters also meant that they were overcooked and dry by the time the the tops were browned. Unfortunately my little oysters got completely lost under a mountain of spinach and bread crumbs. I could almost detect a hint of the sea in this dish, and I thought I found the oyster in a couple of them, but it could have been a clump of bread crumbs. Given the excess of topping, I was surprised at the lack of bacon, you could easily have doubled it without going overboard.

Done right, oysters Rockefeller have a just barely set oyster, with a good deal of liquor left at the bottom, and a flavourful crunchy topping. They can compliment and accentuate the oyster, leaving it as the star of the show. My oysters were, dry, didn’t taste like oysters, and didn’t even try to compensate with bacon. It’s hard to give the recipe a fair rating, because I messed things up. I’m sure that the topping had too little bacon, and too many bread crumbs, I would have liked the anise flavour of the Pernod to come through a little more clearly as well. My final product didn’t taste too bad, but I would have saved an hour, and enjoyed myself more if I’d just slurped the oysters raw.

Categories
Pasta, Noodles, and Dumplings The Book

138. Macaroni and Cheese p.223


The recipe

I haven’t eaten all that much macaroni and cheese since I graduated to shoes with laces, but most of the kids I knew, and the stoners they grew up to be, loved the stuff from the box. As a child, macaroni and cheese was just the brand neutral way of saying your mom was making Kraft Dinner. I decided that KD was not for me around age 5, and looked for creative ways to avoid it, or mask its flavour. For reference, cut up hot dogs made it better, ketchup made it worse. Unfortunately kids in Montreal ate a lot of KD in the ’80s. My mom accepted my quirks and stopped serving it to me, but I still ate a lot of it at friends houses.

I was well pleased to leave mac and cheese behind me by the time I reached high school, and it stayed that way ’till a a nice Southern girl introduced me to the home made version in my early 20’s. Her macaroni and cheese was an entirely different animal, using real cheese, building flavour and texture with a roux, adding a touch of heat, and baking the whole thing with some extra cheese on top. I came around, and macaroni and cheese became something worth looking forward to.

I started experimenting with my own versions of mac and cheese, without much success. The problem I was trying to solve was that M&C is inherently rich, bland, and straightforward. Some people interpret that as a food surrogate for mother’s love, but I find it a bit dull. I tried adding herbs to the M&C, which fubared it, adding more chili flakes didn’t help either. One version with chipotles was actually pretty good, and worth revisiting sometime. Drawing on my childhood hot dog experience, I tried adding some slices of merguez, which worked quite well. These experiments brought me closer to what I was looking for, but they were still lacking. I was happy to discover that Gourmet has hit upon secret elixir that cuts the richness, and ties everything together, Dijon mustard. The Book’s version isn’t perfect, but I’m immensely grateful to it for bringing me closer to the ultimate macaroni and cheese recipe.

In this version, you make a three minute roux with butter, flour, and red pepper flakes, then whisk in milk and bring the sauce to a boil. After letting it boil for a few minutes, cream, extra-sharp Cheddar, and Dijon are added. The sauce is then added to cooked macaroni, and some of the water from the pot in a baking dish, then topped with mixture of butter, panko bread crumbs, and more cheese. The casserole goes into the oven for around half an hour, and then served.

The mustard and red pepper flakes make all the difference, and prevent this from being just too rich to be enjoyable. Getting the cheese right is important too. The recipe calls for extra-sharp Cheddar, which seems simple, but even an average grocery store will have about ten different versions, ranging from the plastic packaged stuff sold along with the milk, to fancy-pants imported stuff at the cheese counter. You can spend a fortune on truly wonderful Cheddar, but it’s probably a waste of money to go melting that into mac and cheese. The low end rubbery stuff will be OK, but not as good as it could be. The cheese really carries this dish so spending a bit more on a nice piece of aged local Cheddar is a worthwhile investment.

The recipe calls for panko, or other dried bread crumbs. I couldn’t get my hands on any panko, so I went with bread crumbs from the bakery down the street. Panko are known for their lightness and texture, while my bread crumbs were quite finely ground and dense. The 2 cups of panko the recipe called for might have been a nice topping, but 2 cups of my bread crumbs probably weighed twice as much as panko did. The macaroni was just too heavy on the topping, and the very dry bread crumbs sucked up a huge amount of moisture, so that within about 20 minutes of taking the dish out of the oven, the macaroni had set up, and lost the saucy-runny aspect you’re looking for in macaroni and cheese. You can see from the photo that it was next to impossible to find any of the macaroni under all the topping.

I think this recipe did a very nice job with the macaroni and sauce aspects, but fell short with the topping. I can’t comment on how it would have been with panko, but while they gave regular bread crumbs as an acceptable alternative, it obviously wasn’t. Beyond the topping, it was probably the best macaroni and cheese I’ve ever had. I’m sure that just a little tweaking could result in a truly great macaroni and cheese dinner, for the adults as well as the kids.

Categories
Pasta, Noodles, and Dumplings The Book

102. Spaghetti with Handfuls of Herbs p.204

I couldn’t find a recipe for this online, but this is more a concept than a specific set of instructions anyway. The idea is to toss spaghetti with extra virgin olive oil, butter, minced shallots, and any and all herbs growing in the garden. The pasta is then sprinkled with bread crumbs which you’ve toasted in olive oil. The heat of the pasta releases the flavours of the herbs, without wilting them too much, and the uncooked shallots are warmed but retain their sharpness.

There are no specific instructions for which herbs to use, or in what proportions. It’s totally dependent on what you have on hand. I had a grand old time out on the balcony with a pair of scissors. I ended up with basil, thyme, rosemary, oregano, parsley, chives, sage, lavender, and lemon balm. Those last two were unexpected flavours, but they absolutely made the dish for me. I got really lucky and randomly combined my herbs into a near perfect flavour medley. I couldn’t repeat the process, I just snipped a bit of this and a bit of that, and I ended up with a completely delicious and intensely fragrant plate of pasta. My dining companion thought it was good, but not transcendent, but for me it was exactly the right dish at exactly the right time. It was perfectly suited to a warm night out on the balcony.

The bread crumb topping adds a textural counterpoint to the pasta, but not one I thought was really necessary. The Book says that the bread crumbs don’t weigh the dish down the way cheese would, but I just found them oily. Admittedly my bread crumbs weren’t coarse, and they might have worked better if they’d been more like tiny croûtons. Mine were more of a sandy coating on my pasta. It didn’t really detract from my enjoyment of the dish, but I think they ruined it for my dining companion.

You may also notice that I didn’t use spaghetti in this spaghetti dish. I can’t bring myself to care about the different shapes of pasta, and I resent having to remember all of their names. They’re all exactly the same, shells, spirals, round strands, flat strands, big tubes, and small tubes all interchangeable in my mind. Sure, some shapes hold on to some sauces better, and finding things hidden in little shells can be cute. But, the idea that we all need to keep fifteen different shapes of pasta on hand to do justice to the traditions of some particular Italian hamlet is just annoying. They all taste exactly the same, and I’m going to use them as such. The only downside is that the different shapes really do differ in surface area. The amount of sauce needed to coat is proportional to area, which has little to do with mass or volume, so it does take some guesswork to avoid over or under saucing.

The concept of this dish is great, it’s simple and summery. It uses herbs at their peak, and allows for creativity around a central theme. It also has the advantage of not heating the kitchen up too too much. I was thrilled with the flavours at work in my version, and I can only hope you get as lucky as I did if you try this for yourself.

Categories
Grains and Beans The Book

101. Cassoulet de Canard p.273


The recipe

This is The Book’s definitive and official cassoulet recipe. I wrote about the Easy Cassoulet recipe a couple of months ago, which skipped steps and cut corners, but still resulted in a very delicious dinner. This adaptation of Julia’s from Mastering the Art of French Cooking takes two days, and goes out of it’s way to find traditional steps for you to follow.

On the first day you soak the beans. But you don’ just soak them. You bring them to a boil and let them sit for 50 minutes. Then you bring them back to a boil, with a bouquet garni, onions, salt, and pork rind you spent the preceding 50 minutes ritualistically rinsing, boiling, and slicing. Then it’s simmer and skim for the next 1 1/4 hours. The beans are then left to cool overnight.

Day one’s activities continue with the skinning, defatting, and shredding of the duck legs, the browning of mutton (I used veal) bones in a whole cup of goose fat, and the caramelizing of onions in that goose fat. The duck, the bones, the onions, and let us not forget the fat are brought to a simmer with bay leaves, stock, tomatoes, garlic, and white wine. After an hour and half on the stove it’s left to cool overnight.

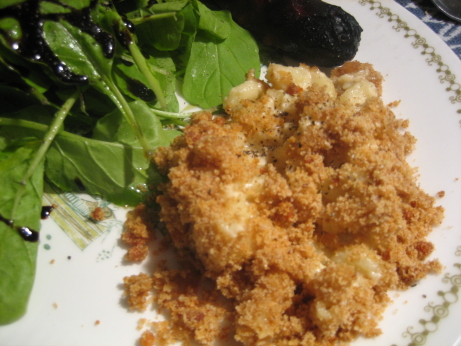
Day two is fairly straightforward. You brown and slice some sausage, and remove the inedible bits from the now cold beans, and the duck mixture. Then the cassoulet is assembled in alternating layers of beans and meat, then topped with bread crumbs and parsley. The recipe calls for a 10 quart enameled cast iron pot, but the biggest one I could get my hands on was 7 3/4 quarts. I managed to get almost everything into the smaller pot, but the full sized pot would have been better. The cassoulet is brought to a simmer on the stovetop, the baked for about an hour until the juices are bubbling up through the crust.

There were a lot of steps, a lot of tricky to source ingredients, and some strange cooking instructions here. It resulted in a rather delicious cassoulet though. I cheated in more than a few places, and messed up in a few others, so I’m not sure the dish came out exactly as it did in The Book’s test kitchens. For the record I had a mix up with the bouquet garni and ended up putting in 15 cloves instead of 5, which really changed the flavour of the beans. I didn’t peel the tomatoes, because I hate peeling tomatoes and I don’t find it’s really worth the effort. I didn’t make beef stock, and I did used the specifically forbidden canned variety. I used a cured garlic kielbasa instead of the fresh garlic sausage called for. I also couldn’t stand the idea of serving the dish with all that goose fat in there, so I removed most of the fat that floated to the top of the meat pot. It was still decidedly rich and fatty, but not nearly as oily as the recipe intended.

That is a long list of cheats, normally I do my best to stick to the recipe as closely as possible, but this time I just wasn’t in the cards. I made the recipe for The Boys on one of our weekend getaways, and I was cooking in an unfamiliar kitchen, with only the equipment I’d thought to bring with me (they don’t cook much, so the facilities are minimal). I couldn’t find some ingredients, some of the steps I just didn’t have time for, and there were a couple of honest mistakes thrown in for good measure. I think the final dish was pretty close to what the original intended though.

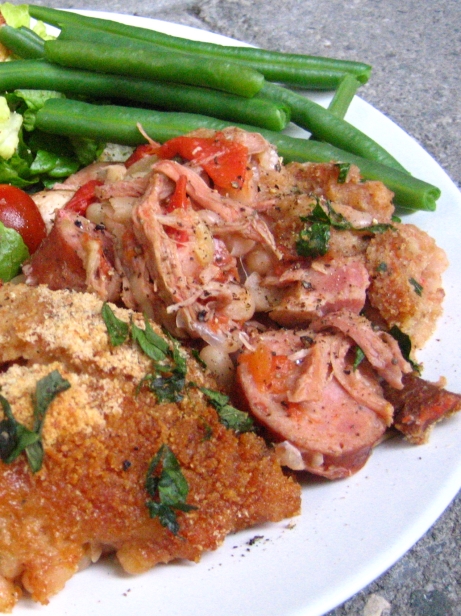
In the end the cassoulet tasted great. It was similar to the easy cassoulet, with the duck and sausage flavours predominating. However, the beans in this version were really worth all the effort. They were tender with a bit of bite left to them, and packed with flavour. Unfortunately a lot of that flavour was cloves, but the smoky bacon, and pork belly were there, with the thyme and onions adding a nice backdrop.

The breadcrumb crust was a bit of a letdown. The easy cassoulet had an amazing crust, made by turning the duck skin into cracklings, and toasting the bread crumbs in some of the duck fat and garlic. That topping was just out of this world, whereas the topping on this dish is just there to absorb some liquid. The recipe has you throw away the confit duck skin and its fat, but then add in a whole whack of goose fat. I really didn’t understand the rationale, it seems like an obvious missed opportunity.

This dish was labour intensive, and I don’t think it would have been nearly as much fun without the help of my co-chef Al. Whenever it’s time to make an excessively fatty fat fat dish, I can count on him. I should also thank the other boys for washing the seeminly endless sink-fulls of goose fat coated dishes this produced. Cassoulet is an absolute indulgence, and indulging is much more fun with friends, especially if you’ve had to work for your reward.

I feel that this recipe is one I’ll make again and again, until I get it just right. My first attempt tasted about as good as the Easy Cassoulet, but I’m sure that with practice this recipe has the potential to blow the easy version out of the water. It’s the kind of dish that people perfect and refine over lifetimes, to get just the right texture in the beans, the perfect amount of bacon flavour, the ideal thickened but still runny texture in the juices. Next time I’ll be much better prepared for some of the more obtuse steps, and counterintuitive instructions. I can see some improvements I’d like to make, but overall it was a delicious, and faithful rendition of a very classic dish.

Categories
Beef, Veal, Pork, and Lamb The Book

76. Cilantro Walnut Filling p.420

The Recipe

This is the filling for Twenty-First Century Beef Wellington. The filling for Beef Wellington in the 19th and 20th centuries was a duxelles and paté de foie. It’s a very French preparation which was renamed and popularized by the British. This twenty-first century version has a lot more in common with Argentina than the old world. I tasted it and my first thought was chimichurri. It’s a preparation of blanched spinach, cilantro, parsley, chopped walnuts, garlic, honey, bread crumbs, egg whites, cumin, corriander, salt, and pepper. The whole thing goes into the food processor and pulsed until smooth.

As a filling for a dish called Beef Wellington it was fairly weird. As a sauce for roast beef tenderloin is wasn’t bad. I can’t get over the preconception of what goes into Beef Wellington. I understand and appreciate the need to play around with traditional dishes, to update them, to take a fresh look at what makes them good, and to help the dishes to evolve with our tastes. Maybe in the twenty-second century I’ll be ready for this filling, but to my palate Beef Wellington without mushrooms in some capacity just can’t be Beef Wellington.

I think I would have preferred to leave the walnuts and cumin out of this filling. Without them it would have been a nice pesto, and might have worked better in the dish. Replacing the walnuts with pine nuts (another pesto classic) would work well too. The walnuts were toasted, and chopped fine in the food processor. This gave them kind of a mealy texture that didn’t really break down into a paste, and didn’t retain much crunch. I also wasn’t crazy about the flavour of the walnuts with the cilantro. The cumin was a distracting touch, that I didn’t think was particularly necessary.

I think a variation on this filling served over a grilled steak would work quite well. It doesn’t stand a chance as a replacement for duxelles in my heart. I give them credit for trying to cut the calorie count of the Beef Wellington, but this isn’t an adequate substitute. I’ll give it a three mushroom rating as a pesto, but as a filling for Beef Wellington it wouldn’t merit more than a two.

Categories
Hors D'Oeuvres & First Courses The Book

73. Sherried Mushroom Empanaditas p.38

The recipe is a combination of this one for full sized Sherried Mushroom Empanadas, and yesterday’s tuna empanaditas. Of course the full sized empanada makes way too much filling, so you’d need to cut it down.

I made these for the same party as the tuna empanaditas. They use the same puff pastry wrapping, and have the same baking directions. The filling however is quite different, and I thought it worked much better than the tuna. The filling is made of sautéed onion, mushroom, and red bell pepper with sherry, prosciutto, parsley, and bread crumbs. The flavour combination worked really well, I though the sweetness of the sherry might be a bit strange but it melded nicely with the other flavours, particularly the mushrooms and prosciutto.

The main advantage this filling had over the tuna was moisture. You can see in the photo that I drastically overcooked them, and there were a few that got completely dehydrated inside. The larger ones managed to remain creamy, with a crisp exterior making for a very nice contrast.

The recipe calls for Serrano ham, which is very much like prosciutto, but a bit tougher in texture, more flavorful, and a bit less fatty. I couldn’t find any for this dish, or any of the other times I’ve looked. It must be available in Montreal, because it’s on the menu at tapas bars, but I don’t know what their source is. The recipe gives prosciutto as an acceptable substitute though.

I was in Spain a few years ago, and fell in love with Serrano ham. The bocadillo de jamon was my preferred lunch, or tapas treat. I had 40 Euros worth of it taken away from my be American customs officials on my way home. The injustice still rankles me. I was only connecting through Newark, my ham and I never left the airport, but they still took it away from me. I would have had to sneak it past Canadian customs to get it home, but losing it to them was a risk I was willing to take. Now whenever I go through the post 9/11 security theatre lines at an American airport I shake my head at the futility of taking my shoes off, and damn them for taking away my precious jamon.

This recipe suffered from the same baking issues as yesterday’s tuna, but I think a bit more monitoring could solve that problem. The flavour combinations were really good, creamy mushrooms, a bit of crunch from the peppers, salty chewy prosciutto, the smooth sweet flavours of the sherry, and even a little freshness from the parsley. The overcooking was a serious problem, so I can’t give it full marks, but there are a lot of things going for this recipe.