Categories
Cakes The Book

202. Carrot Cake with Cream Cheese Frosting p.726


The recipe courtesy of The Ulterior Epicure

Sometimes the stars just don’t align, and the baking Gods abandon you for a day. I’ve learned a lot about cooking and baking through this project, and I’ve gotten to a point where I rarely make the boneheaded mistakes that plagued my early experiments, but there’s always room to regress. Today’s flub up was ignoring the instruction to “butter and flour cake pans, knocking out excess flour”. Every single baked good in the book calls for this step, and it’s become such a familiar phrase that I think I literally didn’t see it when reading the recipe. Sure something felt wrong while I poured the cake batter into the pans, but I was working on three other things at the time and didn’t give it much thought. The finished product suffered as a result, but I’m going to rate it anyway.

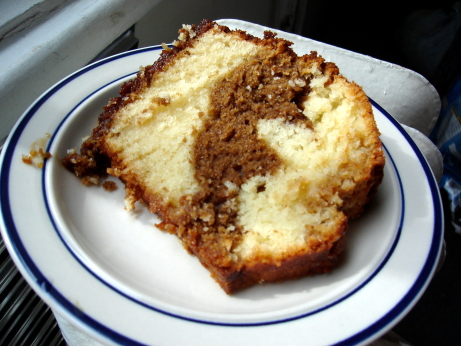
This is a pretty straightforward cake, but it does have quite a few ingredients. Beyond the basic cake stuff (flour, baking soda, baking powder, and salt, vegetable oil, eggs, sugar) the cake mixes in a healthy dose of grated carrot, cinnamon, crushed pineapple, sweetened flaked coconut, walnuts, and raisins. The raisins were optional, and I opted against. The cakes are split into two 9 inch round cake pans and banked for ~40 minutes. Once cooled they’re stacked and frosted with whipped cream cheese, butter, vanilla, and icing sugar.

The Good: The cake tasted great. It had excellent carrot flavour and the cream cheese frosting wasn’t too sweet or too heavy, and set the cake off nicely. I like walnuts in a carrot cake, and this one was no exception. The frosting had a great texture, going on easily, and holding its shape quite well, as you’ll read below the underlying cake had some serious structural issues, but if I had to try to ice something with the texture of a jello salad again, this would be a pretty good frosting option.

The Bad: My main issues with the cake were with the enormous almost goupy crumb of the cake, and its total lack of structural integrity. The recipe describes it as an unusually moist cake, but I think my mishaps turned a moist cake into a barely solid cake. Without the butter and flour in the pans, the cakes stuck. The first cake I tried to unmould fell to pieces, with the baked-on bits staying firmly in the pan, and most of the extremely moist and soft innards flying through the cooling rack I was trying to unmould onto. I tried to free up the bottoms, but the cake was just tearing while it was still warm. Instead of cooling the cakes on racks, I left them in their pans, and was able to get an offset spatula in to free them up once they’d cooled. This probably means that the cakes steamed as they cooled, instead of crisping up on the outside. I can’t know how the cooling in the pan affected the texture of the cake, or how the rough extraction from their pans affected the overall integrity of the cake. As it was, the cake was nearly impossible to cut, it was as malleable as an angel food cake, and the slices crumbled as I tried to serve them. Even chilled the next day getting a piece out as a whole was a challenge. The soft and goopy frosting added more to the structural integrity than the cake itself. The pineapple was added to this dish to make it extra moist, and it did its job. At least with my mixed up cooking instructions that extra moisture probably made a bad situation worse. More importantly, it didn’t taste all that good. I don’t think carrot and pineapple are a natural pairing, and I just found it out of place.

The Verdict: A lot of what went wrong with this cake was totally my fault, but things like the over-large crumb, and not so nice addition of pineapple were certainly problems with the recipe. Looking beyond the serious textural issues, the cake did taste very good. It wasn’t my absolute favorite carrot cake, but it did a good job of delivering carrot flavour in a cream cheese icing package. I suspect that baking this in a 13×9 pan instead of trying to make it a layered cake would make the textural issues much less important, and it would be just as delicious. The cake that I produced was not fit to serve to guests, and the cake I made is the cake I have to rate, but I think I’m going to give this recipe another chance in the next couple of months, and I might decide to revise the rating upwards then.

Categories
Breads and Crackers The Book

198. Currant Tea Scones p.598

The recipe

Scones are serious business. Done right, they’re transcendent, rich, with just a hint of sweetness and a striated flaky texture. A scone should be substantial, but not dense. Unfortunately they’re often done very very poorly. Starbucks gets my vote for worst mass market scone. Their oversized scones are dense enough to sink, and so dry you can’t get through a bite without a sip of coffee. The few times I’ve eaten them I’ve ended up with an Elmer’s school glue paste in my mouth, and a boulder in my stomach. This scone philosophy may work for Starbucks’ bottom line, but it has no place in my kitchen.

This recipe has a much happier take on the classic British treat. Here you make a quick dough by working butter into a mixture of flour, sugar, baking powder, and salt, then gently mixing in half-and-half until a sticky dough forms. You stir in currents which have been plumped in just a couple of tablespoons of hot brewed tea, form the dough into a disk, score it, brush it with half-and-half, then sprinkle it with sugar and bake.

The Good: The scones came out with pretty much the texture I was hoping for, tender-chewy cake stacked in airy layers. The cream and sugar brushing gave a nice gloss to the upper sides, and the bottoms were just barely golden. All in all a pretty darn good scone.

The Bad: I’m quite picky about scones, so while the results were generally good, there was room for improvement. First, they were a little too dry, substituting full fat cream for half-and-half might have taken care of that. Second, I like currants as much or more than the next guy, but half as many would have been plenty. Third, I wasn’t a huge fan of the bake, and then cut, plan with these. I prefer to bake scones separately, because the sweet and shiny outer layer is the best part. This cut-a-disk-up-like-a-cake strategy messes up the surface to volume ratio. Fourth, I thought going in that soaking the currants in tea might add a tea flavour to the scones, but it really did nothing at all. There’s nothing wrong with not-tea-flavoured scones, but the plumping in tea step was a bit of a waste of time. If there’s no way to get the tea above the threshold of human perception I’d just use hot water instead. Finally, this recipe is for an unusually small batch. It makes just 4 scones. That’s about breakfast for two. If I’m going to go to the trouble of making scones I’d like to count on some leftovers, so I’d plan on doubling or tripling the recipe.

The Verdict: Overall this is a solid scone recipe. It’s not my ideal, but I think scones are largely a matter of personal taste. It comes fairly close to what I’m looking for in a scone, and it’s a good basis for further experimentation.

Categories
Cookies, Bars, and Confections The Book

174. Chocolate Sambuca Crinkle Cookies p.671


The recipe

This is a polarizing recipe. If the thought of anise and chocolate together piques your interest, you’ll probably like these cookies. If however that sounds like the worst idea you’ve heard all day, you probably won’t. That may sound trite or obvious, but anise is like that. I don’t know anyone who is neutral on the subject of black licorice. People love it, hate it, or have a complex ambivalence towards it. If a recipe is anise scented, you know right off the bat that that’s going to be a dominant element of the recipe’s flavour.

I’m all for anise, I especially like it in savory cooking, I have a little trouble with those super salty licorice candies the Dutch love, but otherwise anise and I are good. When I first flipped through the cookies section of The Book these ones caught my eye, and I’ve been looking forward to making them ever since. I haven’t done them until now because they needed to be served in the right context. My dining companion and I aren’t huge on desserts, so I usually try to serve them when we have friends over, or to bring them places. It’s hard to bring chocolate-anise cookies to a party or dinner, because you know going in that lots of people are going to hate them. I had to wait until I was making batches and batches of cookies, so that they could be one among many elements of a cookie tray.

The cookie recipe is fairly standard. You sift together the flour, baking powder, and salt, melt bittersweet chocolate and butter in a double boiler, and whisk together eggs, walnuts, Sambuca, and sugar. You then add the chocolate and flour mixtures to the egg mixture and combine. You pop the batter in the fridge for two hours, then roll heaping tablespoons of dough into balls, and toss them in confectioner’s sugar before baking.

The sugar causes the tops to crack, and I was hoping it was going to give the uncracked parts a nice glaze. As you can see a lot of the sugar stayed in white clumps, which I didn’t find too attractive. The insides of the cookies were soft and cakey, studded with walnuts. As predicted chocolate, and anise were the dominant flavours. I used Pernod instead of Sambuca for this recipe (a Book approved substitution), but I should have remembered that Sambuca is much sweeter than Pernod and compensated.

For people who are into anise cookies, these were quite good. They weren’t the most beautiful cookies I’ve ever produced, but the texture was very nice, and the rich chocolate and anise combination was a winner for me. I try to take other people’s opinions into account when rating these recipes, I usually estimate other’s average ratings, and split the difference between their liking and mine. But we have a bimodal distribution here, and the mean is no longer a meaningful statistic, the mode or the median aren’t much help either. Since this is the food blog part of my life, and not the behavioral neurobiology part, I get to violate good statistical practice, and just ignore all those anise haters.

Categories
Cookies, Bars, and Confections The Book

172. Brown Sugar-Ginger Crisps p.665


The recipe

I made these cookies in the middle of a cookie-baking frenzy, I was buying ingredients for about five different types, with a couple of backup shopping lists in case I couldn’t find all the stuff for the first tier cookies. Somehow the crystallized ginger that this recipe called for never made it into the basket. I discovered this once I was home and ready to start baking, and just not at all interested in going out to hunt down crystallized ginger. I’m an industrious guy, I figured I could crystallize my very own ginger. I looked up a few recipes on the web (The Book doesn’t have one) and it didn’t seem too difficult, although the recipes were very inconsistent. Some called for boiling chopped ginger in a sugar syrup for about 20 minutes, some asked you to boil the ginger in syrup for an hour, let it steep in the sryrup for a day, boil it for another hour, and to repeat this process every day for a week. Since I was interested in using this ginger for cookies that very afternoon I went for a middle ground and chopped the ginger very finely, and boiled it in a concentrated syrup for 2 hours. It was no where near as good as the store bought kind, quite ugly, and very hard, but it basically tasted like candied ginger. No one else was much interested in my crystallized gingers, but they were my little treat, I loved them with a cup of coffee in the afternoon.

The ginger did a serviceable job in these cookies. They’re a fairly standard cookie base of butter, brown sugar, egg yolk, and vanilla creamed together, crystalized and ground ginger mixed in, and a mixture of flour, baking powder, and salt gently stirred in. They came out as very thin and crisp cookies, studded with the ginger chunks. “Real” crystallized ginger is soft and pliable, whereas my improvised version was quite tough. On the first day they were baked they had a nice crispy exterior with a chewier interior. The recipe says they keep at room temperature for a week, but I found that they lost their crispness overnight. I really would have preferred the chewiness of the professionally produced product in the cookies. Other than that they were nice, they didn’t blow me away, and I probably wouldn’t have asked for a recipe if they’d been served to me, but they were perfectly good.

A strange thing about these ginger cookies is that they weren’t particularly gingery. Beyond the crystallized ginger there’s only 1/4 teaspoon of ground ginger in the recipe. If I made them again I’d up that to 1 teaspoon, many of the Epicurious posters suggest that it improves the cookies dramatically. As written this recipe makes a nice buttery cookie, with a hint of ginger flavour and chewy bites of crystallized ginger. It’s possible that I missed out on what this recipe had to offer with my sub-standard ginger, as they were I liked them well enough, but wouldn’t go out of my way to make them again.

Categories
Breads and Crackers The Book

168. Cheddar Scallion Drop Biscuits p.597

The recipe

The Boys were over for breakfast, and I decided to make them biscuits. One of them has been living down in the Carolinas for the last few years, and has become something of a biscuit connoisseur, so I didn’t dare try a traditional buttermilk biscuit. These are far simpler, and less error prone. It’s a basic biscuit dough (flour, baking powder, baking soda, salt, butter, buttermilk) with a bit of sugar, cheddar cheese and scallions mixed in. These aren’t kneaded or shaped which when done wrong can toughen the biscuits, they’re not cut out so there’s no risk of collapsing the flaky layers, and there aren’t twenty generations of ancestors looking over your shoulder to make sure you do it exactly right. You just blend butter into the dry ingredients, stir in the cheese and scallions, and barely mix in the buttermilk (gluten is still your enemy). The biscuits get unceremoniously dropped onto a baking sheet, and stuck in the oven.

As Epicurious posters have noted, the cooking time is off, at 450 these will be burned after the recommended 18-20 minutes, I started smelling a hint of char from the bottoms after 14-15 mintues. so don’t get too far from the oven, and use your nose.

They tasted a lot like the biscuits at Red Lobster. I don’t think I’ve been to a Red Lobster since 1998, but the taste of their biscuits is stuck in my food memory. They’re less over the top greasy (which unfortunately means not quite as good), in fact they’re a little dry. A bunch of the Epicurious posters recommended adding more buttermilk, and I think I’d go with that suggestion next time. The cheese flavour is prominent in these biscuits, I used some middle of the road aged cheddar, but I’d definitely choose the oldest sharpest stuff I could get my hands on next time, the cheese is the make or break ingredient, so choose it wisely. I really liked the addition of scallions, the onion flavour wasn’t overwhelming, or un-breakfasty, just delicious. The exteriors of these biscuits were glossy and crispy, and while the insides were a bit dry once they’d cooled, they were lovely and tender when warm. The solution is obviously never to let these cool down.

These biscuits were a success, they’re fairly idiot proof, so I can handle making them before the espresso machine has heated up. The ingredients are mostly things you’ll have on hand (or maybe normal people don’t absolutely always have scallions in the fridge, but that’s just semantics), they taste good, and look pretty. While the recipe has a few problems, with a couple modification I think they could be a breakfast standby.

Categories
Breakfast and Brunch The Book

144. Coffee Coffee Cake with Espresso Glaze p.644


The recipe

I brought this cake to a brunch at a friend’s last spring. I’m going to have a difficult time giving it a fair rating, because I had horrible seasonal allergies and couldn’t taste anything. I barely remember the brunch, and had to leave after about an hour. My head was so muddled that I’d forgotten my camera, and had to borrow the hosts. He sent me the photos recently, and I’ve been trying to piece this dish back together. The recipe is found in the Breakfast and Brunch section, but it could certainly work for a dinner party.

I should say to anyone reading this that actually attended the brunch, that even though I was feeling awful and sneezing with abandon, I was scrupulous about leaving the room to sneeze, and washing my hands thoroughly before touching your food. I really hate to cook when I’m sick, and definitely worry about contaminating people. I’m not sure how paranoid that actually is though. People who work in restaurants go to work sick all the time, it’s not something we like to think about, but it’s true. If Anthony Bourdain is to be believed they also go to work high, blood splattered, and vomiting, and we’re generally all right. I have a lot of faith in the awesomeness of the human immune system, and the abilities of heat to kill off the nasty stuff that’s gotten into our food. That doesn’t mean I’m willing to take a chance with someone else’s health though.

The recipe followed a fairly standard cake method, mix the dry ingredients, flour, baking powder, baking soda, and salt, in a bowl, then cream butter and sugar in another bowl, add eggs, and vanilla. Then, add the dry ingredients, and sour cream, in alternate batches to the wet ingredients. You then separate 1/3 of the mixture, and add barely dissolved instant espresso to it. You then layer the light and dark batters in a buttered bundt pan and bake for about an hour. Once the cake is unmolded and cooled, you cover it with an espresso glaze made with instant espresso powder, strong brewed coffee (I used a shot of espresso), and confectioners sugar.

I did eat a piece of this cake, but I have no idea what it tasted like. The bitterness of the coffee was the only flavour that managed to cut through the fuzzy sock coating my tongue. Since it’s from The Book, I’m willing to to out on a limb and say that it was probably too sweet. It had a very appealing texture though, moist, with a big fluffly crumb. My dining companion remembers this cake fondly, and it was well received at the brunch. Most of it had disappeared by the time I crawled home to bed. Since people praised it at the time, and brought it up weeks later, it can’t have been bad. The recipe is found in the Breakfast and Brunch section, but it could certainly work for a dinner party. If I didn’t have so many other recipes to get to, I’d make it again, just to find out what it was really like.

I’ll give it an estimated rating of

Categories
Breakfast and Brunch The Book

132. Blueberry Muffins p.641


The recipe

My dining companion has been doing a lot of driving for work over the past few months, and I’ve been looking for little treats that travel well to send along with her. These muffins looked like they’d fit the bill, and I was pleased to discover that they’re not just portable, they’re tasty. They’ve got another of Ruth’s seemingly unnecessary streusel toppings, but that’s not such a bad thing.

The recipe follows the standard muffin method, mix the wet stuff together, mix the dry stuff together, add the wet stuff to the dry stuff, and mix until it’s barely combined. In this case the wet stuff is played by melted butter, whole milk, egg, egg yolk, and vanilla, while the roles of the dry stuff are capably portrayed by flour, sugar, baking powder, and salt. Once the muffin mixture is together, the blueberries are delicately folded in, and the batter is divided into muffin cups. It then gets topped with a shortbread like mixture of flour, butter, and sugar. The muffins bake at 375 for 18 – 20 minutes.

The muffins were very simply flavoured, rich and moist, with a carefully balanced sweetness that enhanced the blueberries. I like to give credit where credit is due, and this is one baked good where The Book got the sugar right. The topping was less successful, the recipe says to bake the muffins ’till they’re golden and crisp, but they were cooked through, and smelling done before the topping changed colour. If I’d waited any longer the undersides would have burned. I think there was just too much topping, so it was left a bit raw looking. It tasted quite good, but wasn’t as visually appealing as I would have liked.

This recipe gets nearly everything right, good texture, clean flavours, satisfying richness, and a wallop of blueberry essence. Unfortunately the undercooked topping takes away from the effect. I’d certainly make these again, but I’d use half the topping, or omit it entirely. It did lend a nice contrasting texture, but the “studies in white, number 6” vibe didn’t do it for me. Overall quite a nice muffin though.

Categories
Poultry The Book

125. Chicken with Cornmeal Dumplings p.373


The recipe

I had The Book for a while before I started The Project, and this was one of the recipes I used regularly before The Book and I got serious. Making it again emphasized how much The Project has changed my cooking style. The biggest difference is that I actually read the recipe this time around, and it came out much better.

You start by breaking a chicken down into serving sized pieces, browning them, and then simmering them with white wine and shallots ’till the pieces are cooked through. Meanwhile you put together a dumpling dough with flour, cornmeal, baking powder, baking soda, salt, pepper, butter, chives, parsley, and buttermilk. The chicken is moved to the oven, and the juices left in the skillet are fortified with stock, cream, salt, and pepper. Once this gravy is simmering the dumplings are gently dropped in and allowed to cook for about 15 minutes, then it’s time to eat.

This time around the cooking went well, there wasn’t anything too tricky about it. In previous attempts I’ve managed to really mess things up. The biggest lesson I learned is that the cooking vessel the recipe calls for really is important. In the recipe all of this happens in a deep 12 inch heavy skillet, I don’t have one of those (but if Santa got my letter…), so I used to make it in a 5 quart pot. It seemed like a pretty decent substitution at the time, but I was wrong. Getting the dumplings right depends on the depth of liquid they’re simmered in, too deep and they disintegrate, or raft together into one super-dumpling. This time I used a 10 quart oval dutch oven, which has a similar surface area to a 12 inch skillet, and things worked out. The other lesson I’ve learned is the difference between a simmer and boil. Previously I had my gravy boiling away, and the bubbles tore my dumplings to shreds, a gentle simmer with just the occasional bubble reaching the surface is the way to go. I’m kind of amazed that I made this recipe about five times trying to get it right, and I didn’t pick up on what I was doing wrong.

My previous attempts also fell prey to my undiagnosed culinary dyslexia.I constantly mix up shallots and scallions, I have the hardest time keeping them straight. They’re very different, but it’s a coin toss as to which vegetable I’ll imaging when I hear one of those words. I’m embarrassed to say that I have the same problem with elevators and escalators, weird eh? Long simmered scallions turn kind of yellow and gross, I wouldn’t recommend the substitution. Some practice with The Book has made me sensitive to my neurological condition, so now I double check that my shopping list corresponds to the ingredient list.

My standards for what constitutes a successful recipe have also changed over the course of The Project. In the pre-Project days this came out reasonably well a couple of times, and I was quite impressed by it. I still love the dumplings, and I’d be happy to make them again and again, but the chicken is lacking, and the whole dish is bland. I’ve ranted about chicken skin and wet cooking methods several times, and it was just as unappealing here as in every other dish. The chicken is poached in white wine and shallots, which is fine, but the addition of another herb would be nice, maybe thyme, rosemary, or tarragon. The chicken gives up flavour and interest for the sake of the dumplings, and it’s almost a fair trade. The dumplings have an excellent texture and flavour, they pull in loads of chicken flavour, and have a wonderful buttermilk tang. They’re absolutely the highlight of the dish. I’d rather skip the whole chicken making part of this dish, and just make the dumplings in a stock based gravy. The chicken would be better served by being simply grilled, then served along with the dumplings. Doing something about the beige on beige colour pallet would be nice too.

Maybe I’m being a bit unfair. This dish is a Southern classic, but I have no clue what it’s supposed to taste like. I don’t have any reference point, so I’m probably trying to turn this dish into something it was never meant to be. Using a chicken like this allows a little bit of meat to be stretched into a hearty meal, so there are perfectly good reasons for recipes like this to have developed. And, Its blandly fatty simplicity is what comfort food is all about, but it’s not really my thing these days.

Pre-Project me liked this dish because the dumplings are awesome, but also because it’s essentially a one pot dish, it’s quite inexpensive, not too hard, and it makes good leftovers. Present day me doesn’t mind working a little harder, spending a little more, or using a few more dishes (much to my dining companion’s chagrin) for a better dish. I agree with my former self about the dumplings though.