Categories
Sauces and Salsas The Book

131. Pesto p.889


The recipe

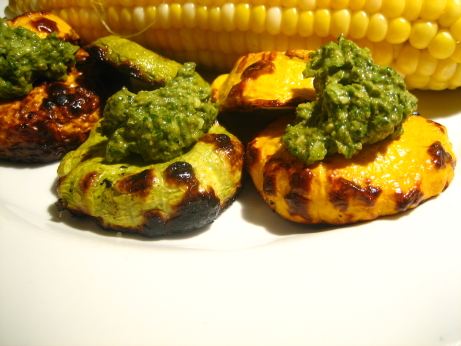
I’m so happy I made this pesto. I went up to the market, and paid a nice lady twelve dollars for an enormous bucket full of perfectly fresh and amazingly fragrant basil. I got my bounty home and I was ready to go into industrial pesto production mode. Unfortunately I’d forgotten that a bushel of basil was going to require a lot more pine nuts than I had on hand to turn into pesto. My neighborhood isn’t lacking for bulk food stores, but it would seem everyone else had the same weekend project as I did. There wasn’t a pine nut to be had, except at the mysteriously overpriced store-of-last-resort. My precious basil was wilting on the counter at home, so I sucked it up and paid saffron prices for my pine nuts.

I got home, and I was finally ready to start. But I discovered that my beloved food processor had died on me. I use an inherited Robot Coupe processor, that has to be at least 25 years old. It’s a little the worse for wear, but it’s always worked perfectly. I love its simplicity, only one blade, and a switch, controlling pulse and stay on modes, that’s it. It has a very solid motor, a decent sized bowl, and no superfluous gimmicks. I wasn’t ready to give up on my workhorse of a processor just yet, so I did a little jury rigging. After disabling the safety feature that prevents the blade from spinning without the top on with the eraser off the back of a pencil I was good to go. I’m convinced that I’ll lose a finger to the machine, and I’m mildly terrified of it, but I’m keeping it for now.

Thankfully I was able to get to the recipe without any further setbacks. The pesto is very straightforward, and much like every other food processor pesto recipe in the world. You add garlic to the running processor, then add pine nuts, Parmigiano-Reggiano, salt, pepper, and basil leaves, then chop it up and add olive oil in a slow stream with the motor running ’till it’s nearly smooth.

I planned on freezing most of my pesto so I omitted the cheese (as per the recipes recommendation), and froze the pesto in ice cube trays. I now have two big Ziplock bags full of pesto in the freezer. I’ve been making giant batches of pesto for the last few years and I absolutely love having it on hand. It’s an integral ingredient in my pizza sauces, and I think of it as a security blanket for uninspired nights when I need to cook quickly. I just toss pasta with a cube of pesto, and a bit of pasta water, top with grated Parmigiano-Reggiano and black pepper and I’m eating within 20 minutes.

If you’re planning on making pesto ice cubes I’d recommend going to to dollar store and getting a separate set of ice cube trays for the purpose. I used our everyday trays, and despite a thorough wash is hot soapy water I could swear my G&T tasted of basil.

This is a very standard, solid pesto recipe, it goes a little heavy on the oil, but is otherwise great. It’s actually a bit hard to know if I followed the recipe properly. It calls for 3 cups of loosely packed fresh basil leaves, but what exactly does that mean? I know we North Americans like our recipes in cups and spoonfuls, but in this case a weight measurement for a dry ingredient wouldn’t kill them. I’ll happily convert ounces to decent metric units, but please give me a halfway precise estimate of how much basil this recipe calls for.

I’m very happy with the way this pesto turned out, it freezes wonderfully, and I’ve been enjoying it a little at a time. Right now it’s just a nice treat, but by mid-February having summer-fresh pesto on hand is going to be a critical weapon in the fight against the bleak winter dreariness. I’d highly recommend that everyone devote one day in late summer to making a giant batch of pesto, and enjoying the fruits of your labour all winter long.
Categories
Pasta, Noodles, and Dumplings The Book

130. Pasta with Tomato and Basil p.206


Unfortunately there’s no recipe for this one.

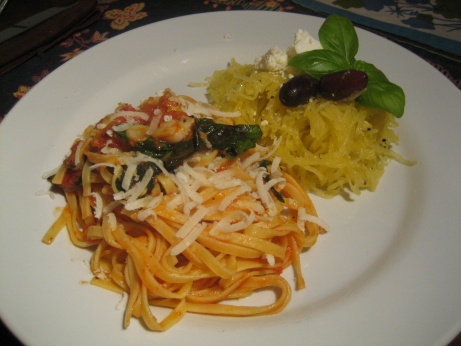
This is a recipe for September. It has only a few ingredients, and they’re available year round, but the rest of the year it’ll be a pale imitation of itself. This incredibly simple pasta sauce starts with browning garlic slices in olive oil, then adding chopped tomatoes and basil branches and simmering for 20 minutes. You then stir in basil leaves, season with salt and pepper, and toss it with fettuccine.

It could not possibly be simpler, so it comes down to the quality of your ingredients. I’m sure making this with canned tomatoes, Chinese garlic, and greenhouse basil would taste pretty good, but you’ll miss the whole point. My favourite part about this recipe is its sense of time and place. In late August and September the tomatoes are abundant and deliriously flavourful, basil is growing like a weed, and freshly dug garlic is just turning up at the markets. During this perishable moment all the ingredients for this recipe are at their peak, and they’re practically being given away. I feel it’s my duty to try to use up as many of them as I can, and ideally to do as little to them as possible.

I thought this dish was just wonderful. It managed to capture the essence of late summer on a plate. The tomatoes broke down, but kept their just-picked flavour. My garlic was so fresh it was next to impossible to peel, and the pungent basil left me reeling. The fettuccini drank up the sauce, and took on its flavours. Finished with a bit of Parmigiano-Reggiano, and a grind of pepper I just couldn’t have asked for a better meal.

My dining companion thought it was good, but nowhere near as earth-shattering as I did. Whether it was the recipe, or my state of mind that day, it struck me as a near perfect dinner. It might deserve a full five mushrooms, but I’m going to deduct a half-a-mushroom for instructing me to peel the tomatoes, which seems like a total waste of time for a rustic casual pasta dish like this. Also, since it didn’t move my dining companion, I can’t in good conscience give it full marks.

Categories
Beef, Veal, Pork, and Lamb The Book

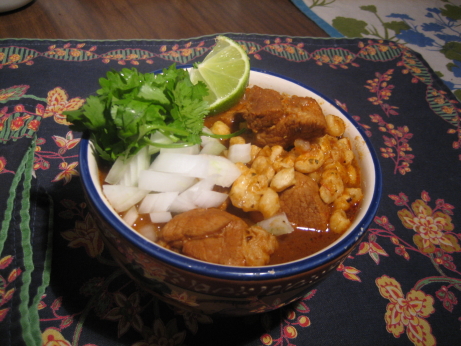
129. Posole: Pork and Hominy Stew p.486


Epicurious doesn’t have a recipe for this one, but one of the posole recipes I found on there looks great, and might address some of my concerns with this dish.

I was really excited to make this. My dining companion came home raving about the posole at Le Jolifou, a great Montreal restaurant which specializes in Mexican inspired Québécois dishes. A couple of weeks later we looked through The Book, and tried its take on posole. I can safely say that this recipe didn’t live up to Le Jolifou’s exacting standards.

Posole is a Mexican stew, which usually features pork and chiles and always features hominy (confusingly also called posole). This was my first experience with hominy, which are corn kernels that have had the outer hull removed by soaking in an alkaline solution. This is a really cool example of ancient food chemistry. At some point someone decided to boil their corn with a handful of ashes from the fireplace, and found that the corn tasted better and the family was healthier. The treatment makes the corn kernels more digestible, more nutrients become available, and it’s nutritionally complete enough to be a staple food. Without this process people surviving on corn will become malnourished and develop pellagra. Europeans brought maize back from the new world, but didn’t treat it, and pellagra became widespread. I’ve idly wondered what the difference between polenta and grits was for a while, and now I know. Polenta is made from untreated corn meal, while grits are made with treated corn meal, simple, but it wasn’t obvious. If you’re looking to geek out on more food science check out the Wikipedia page on this process, called nixtamalization.

Despite my affection for hominy, this posole wasn’t great. It’s simple to make, just soak pasilla and guajillo chiles in water, then run them through the blender with oregano, salt, cumin seeds, pepper, garlic, tomato, and onion. You then simmer cubed pork shoulder in this sauce for an hour, add canned hominy, and continue to simmer for half an hour more. The stew is served with any combination of radishes, onion, cilantro, lettuce, chiles, lime wedges, and tortillas or tortilla chips.

The sauce has some very nice flavours to it, and I love pork braised with chiles, but the texture wasn’t great. I’m not really sure what happened, but my pork cubes ended up tough and dry, swimming in a thin sauce, with a huge amount of hominy. I would have preferred a thicker chunkier sauce, perhaps leaving the tomato and onion out of the blender, or mashing some of the hominy would have helped to thicken it up. I also would have preferred to shred the pork into the sauce. I found the chunks too big, and not amazingly flavorful. The recipe calls for three 15 oz cans of hominy, which should really be reduced to two. The other recipe I linked calls for 26 cloves of garlic, the version in The Book calls for only one. I’m not sure if I’d up the garlic quite so drastically, but I’d seek out a happy middle. The hominy itself was really interesting, it has a very unique chewy texture, which I liked. I’m not sure I’d really want to eat a whole lot of it at one sitting, it reminded me a bit of the tapioca balls in bubble tea.

As with most stews the posole improved with age. By day three the pork had soaked in more flavour, and softened, and the whole dish was more cohesive. It was perfectly edible, and even enjoyable, but my dining companion’s stellar dinner out had really built up my expectations for this posole, it just couldn’t live up to them.

Categories
Beef, Veal, Pork, and Lamb The Book

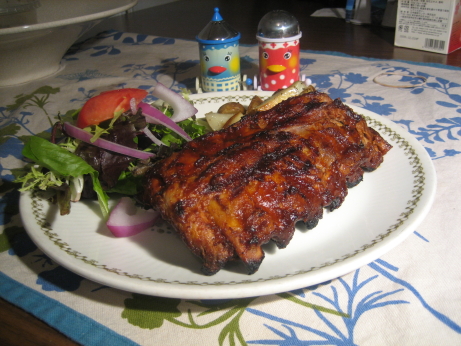
127. Barbecued Chile-Marinated Spareribs p.490

There’s no recipe for this one.

These ribs are dead simple, but they take some forethought. The ribs are simmered in water for an hour, then marinated in sauce of New Mexico chiles, ketchup, garlic, cider vinegar, brown sugar, salt, tequila, vegetable oil, ground cumin, and ground allspice for the next eight hours. Half of the sauce is used for the marinade, a quarter to baste during cooking, and the remaining quarter as a dipping sauce at the table. A little more than an hour before dinner the ribs come out of the fridge and warm to room temperature, then they’re transfered to a grill over low flame for 35 minutes. They’re basted with more of the sauce for the last 15 minutes of grilling time, then they’re rested for a few minutes, and served with the remaining sauce.

The barbecue sauce was simple and delicious. It filled its three roles admirably, it was salty enough to penetrate deeply as a marinate, sweet enough to turn to glowing caramel on the grill, and the uncooked dipping sauce’s raw edge complimented and contrasted the cooked sauce on the ribs. I was very happy to find a barbecue sauce that has a good deal of complexity, and shows some restraint with the sugar. I often find that restaurant ribs are sticky pork candy without much going on beyond slightly spiced ketchup. The bit of the tequila in the dipping sauce was a nice touch, of course bourbon wouldn’t be out of place either.

I’d make the sauce again without hesitation, and slather it on pretty much anything destined for the grill. Unfortunately I don’t think the hour-long simmer did the ribs any favours. They were wonderfully falling apart tender, but I think they gave up a lot of their flavour to the water that went down the drain. I wonder if steaming the ribs, then reducing the steaming liquid and adding it to the sauce would have brought more of the porky goodness to the plate? I preferred the texture and flavour of the meat from the Chinese-Hawaiian “Barbecued” Ribs where they were slowly roasted in the oven. I can’t really see why that technique wouldn’t work with this sauce, and it’s probably worth a test.

Both of those recipes use the word barbecue without actually grilling anything low and slow. I don’t really understand why The Book avoids a long grill over offset heat? Even with my gas grill with few soaked hardwood chips for smoke, I’d bet that basting the ribs with this sauce for a few hours would result in some pretty good barbecue.

I was actually happy with the way these came out, but they could have been even better. The cooking technique literally threw the baby out with the bathwater. They still tasted very nice, but it was primarily the delicious sauce that came through. The pork was there, but not nearly as prominent as it deserved to be.

Categories
Soups The Book

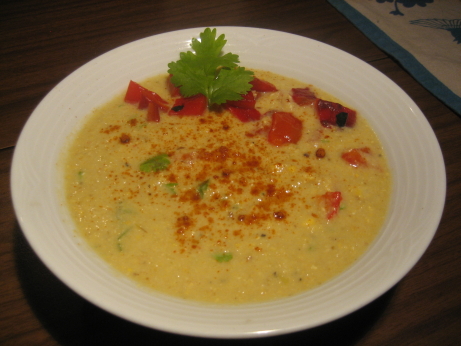
126. Mexican Corn Soup p.87


There’s no online recipe for this one.

I just don’t know about summertime soups. The Book has dozens of cold soups based on fresh sweet fruit and vegetables. I can’t say that they appeal to me very much. In part it’s the dissonance of cold soup that bugs me, but I’m not even a huge fan of hot soups. When I ask myself what I feel like eating, the answer is almost never soup, especially not in August. For a cold soup, this was fine, but I won’t go out of my way to make it again.

You start by sweating garlic, onion, jalapeños, carrot, and celery with cumin, coriander, salt and pepper. Then stock, water, and both corn kernels and cobs are added and simmered. The cobs are discarded, and the soup is puréed in the blender. Once the soup has cooled to room temperature, some whole cooked corn kernels are stirred in along with roasted red bell peppers, cilantro, and cayenne.

A significant amount of effort went into building flavours for this soup, and they were well balanced and subtle, but they faded to the background almost instantly. I picked up the ingredients for this recipe a few days before I got around to making it, and by then the dew-kissed market-fresh corn I’d chosen wasn’t looking as lively as I would have liked. If I’d had really stellar corn maybe the other flavourings’ camouflage act would have been a positive, and I’d be going on about them not getting in the way of the corn ambrosia. As it was my corn could have used a bit of help.

I had leftovers of this soup for a few days, and it was much better on day three than in the beginning. A footnote to the recipe suggests that you can make it up to a day in advance, but I’d ignore that and give it at least two days to come together. We at this soup as our main course with a chunk of baguette and a simple salad. The soup just wasn’t interesting enough to anchor a meal. It might work as a first course, or better yet as an appetizer soup shooter. Those first couple of bites were good, so why not just stop there?

There wasn’t anything spectacular about the soup, but it wasn’t bad either. I used all the leftovers for lunches, instead of letting it moulder in the back of the fridge. It was solidly average. If I made it again I’d add more jalapeño and less cayenne. More of the jalapeño’s fruity complexity would have been welcome, instead of the straightforward cayenne heat. Stirring in a bit of sriracha chili sauce on day two or three improved matters.

Every summer I feel guilty about not eating enough amazing Quebec corn, especially when you can get a dozen ears for a dollar. Making corn soup seems like a great way to use up that summer bounty when you can’t face another ear of corn on the cob. Unfortunately I forget that I’m replacing the problem of the twelve ears of corn staring at me from the vegetable drawer, with five liters of left-over soup.

Categories
Poultry The Book

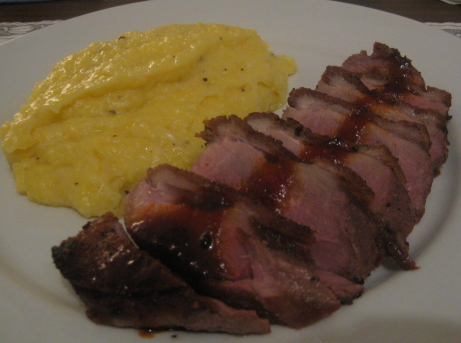
121. Duck Breasts with Orange Ancho Chile Sauce p.396


The recipe

This recipe was a show stopper. It’s the only recipe for duck breast in the book, and that’s a real shame. Magret de canard is one of the staples of the Québécois culinary scene, a distinctive take on the seared duck breast is de rigueur for any restaurant interested in cuisine de terroir. Fusion may have been the dining buzz-word of the 90’s, but it’s certainly alive and well. It would seem that every third restaurant to open in the city has a _________ inspired menu playing on Québécois classics, most likely in tiny, tapas style portions. This Mexican influenced magret would fit in beautifully.

The duck breast is seasoned with salt and pepper, and simply seared. The skin renders enough fat that oil isn’t necessary. The sauce is made with a purée of Ancho chiles, and garlic which is added to a caramel of orange and lime juices, then finished with butter. The sauce had a lovely balance of sweet, acid, and heat, which complimented the powerful flavour of the duck. Duck does wonderfully with a slightly sweet sauce, and the orange caramel fit the bill, the rounded smoky Ancho flavour tempered the sweetness and played up the depth and body of the duck.

Lots of people think they don’t like duck, and avoid it, or have only ever encountered it in Chinese preparations. A simply seared duck breast might be a revelation for them. My dining companion’s mother told us over dinner about her childhood experiences of eating duck. Apparently her family got it’s duck from local hunters, and they risked a mouthfull of buckshot with every bite. She recalls that it was too gamy and intense to be enjoyable, so she avoided it for the next twenty years, but these days she’s a fan. The duck we get today is raised on farms much like chickens, and the flavour appears to have mellowed. People deplore the fact that pork doesn’t taste like pork anymore, but no one complains that duck has lost its muskiness. I’ve never had duck from a hunter, but I’d like to compare some time.

Looking at that beautifully pink duck breast is making my mouth water. It occurs to me though, that duck is the only poultry you’d ever consider cooking to less than well done. A medium-rare chicken breast brings on gasps of revusion, not delight. Duck really does taste best when pink though.

If you’ve never tried a magret de canard I absolutely encourage you to, and the sauce The Book has paired with this one is a wonderful compliment. I loved that the sauce showed off everything I enjoy about duck breast, without trying to show it up. Duck Breasts with Orange Ancho Chile Sauce you’ve earned your five mushroom rating.

Categories
Fish and Shellfish The Book

120. Scallops Provençale p.319


The recipe from Epicurious is similar to The Book’s version, but only makes half as much.

I made these for my dining companion’s parents, who came for a surprise visit. The last time I cooked for them the pyrex pan I had my gravy in exploded, so I was a bit nervous about this dinner. We decided on a scallop and shrimp first-course, and duck for the main-course.

I had a great time shopping for ingredients with them. My dining companion’s father really enjoyed going to the cheesemonger’s, the butcher’s, the baker’s, the fruit and vegetable stand, and the fishmonger’s shops instead of a one stop mega-mart. It’s one of the things I love about my neighborhood, but sometimes I take it for granted.

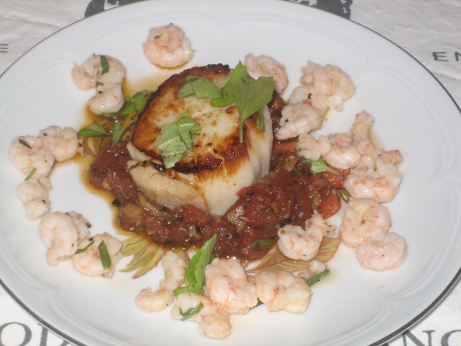
The scallops were a very nice way to start our meal, and it was an easy dish to put together. The scallops are simply seasoned with salt and pepper and then seared. Once the scallops are done a two-minute tomato sauce is brought together in the pan with garlic, thyme, and basil. The tiny shrimp in the photo were seared, the pan was deglazed with pernod, and finished with tarragon.

The scallops were magnificent. I got lucky and cooked them just right, with a tastily browned crust on the outside, and a just barely cooked centre. I’ve had difficultly with scallops before, particularly little ones, but these jumbo scallops were wonderfully easy to work with, and had and amazingly fresh and mild maritime flavour. I really dislike the metallic flavour scallops can sometimes have, but there wasn’t a trace of that in this preparation. I was careful to rinse them thoroughly before cooking, which may have helped.

The sauce was nice, but nothing particularly special. My main complaint was that it was too oily. The scallops had a fairly subtle taste, and the tomato and garlic tended to overwhelm it a bit. I very much like shellfish tossed in a tomato based pasta sauce, where the flavours mix and mingle, but in this case I was really enjoying the clean flavour of the scallop all on its own. The thyme and particularly the basil enhanced the scallop’s flavour without covering it up though. I ate most of the sauce with the little anise flavoured shrimp, which was wonderful combination. I think I might add a bit of pernod to my next pasta dish.

I thought this worked really well as a first course, it was a very pretty dish, and it really wasn’t very much trouble to put together. Those gigantic scallops aren’t inexpensive, but since you can get away with one per person as a first course, or two to three each as a main, they’re not out of reach. I’d certainly make this again, but I might tone down the sauce a bit.

Categories
Poultry The Book

116. Grilled Cornish Hens with Basil Butter p.392

The recipe for this one isn’t online, but it was so good I’m going to give it to you here.

3/4 stick (6 tablespoons) unsalted butter, softened
1/4 cup chopped fresh basil
3 garlic cloves minced
1 teaspoon salt
1/2 teaspoon freshly ground black pepper
2 (1 1/4- to 1 1/2- pound) Cornish hens, rinsed and patted dry

Stir together butter, basil, garlic, 1/2 teaspoon salt, and 1/4 teaspoon pepper in a small bowl.
Prepare a charcoal or gas grill: if using a charcoal grill, open vents in bottom of grill and in cover. Spread charcoal evenly on one side of grill (about 60 briquettes) and light. Fire is medium-hot when you can hold your hand 5 inches above rack for just 3-4 seconds. If using a gas grill, preheat on high, covered, for 10 minutes, then reduce heat to moderate.
Meanwhile, flatten hens (see below). With kitchen shears, cut out backbones. Pat hens dry again, then spread flat, skin side up, on a cutting board. Cut a half inch slit in each side of each hen in center triangle of skin between thigh and breast (near drumstick). Then tuck bottom knob of drumstick through slit. Tuck wing tips under breasts. Work your fingers between skin and flesh of breasts and legs and loosen skin without detaching it entirely, being careful not to tear it. Spread butter under and over skin. Sprinkle hens with remaining 1/2 teaspoon salt and 1/4 teaspoon pepper.
Lightly grill rack and grill hens (covered only if using gas), turning once until browned, about 10 minutes. Transfer hens to side of charcoal grill with no coals, or, if using gas, move hens to one side and shut off burner below them. Cover with lid and grill until cooked through 20 – 25 minutes more.

COOK’S NOTE
The hens can be prepared for cooking and rubbed with butter up to 2 hours ahead; refrigerate covered.

The recipe provides a further description of the bird flattening technique, called spatchcocking, in an inset panel, with a few of The Books line drawing illustrations.

This recipe combines a few nifty techniques to great effect. First it uses a compound butter, which is an awesome tool in a cook’s arsenal. They can be made ahead, flavoured with just about anything, and bring a big punch of flavour and buttery goodness to a dish very quickly.

Second, the spatchcocking technique was a great find. I’ve been using it on chickens and it works wonders. The great advantage is that the whole bird ends up being uniformly thick so the breasts cook at the same rate as the legs. It also allows the whole thing to cook much more quickly.

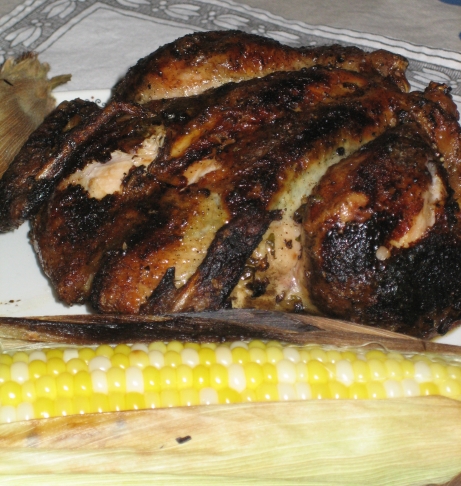
Third, loosening the Cornish hen’s skin and rubbing the butter into the space between skin and flesh adds fat to the bird which keeps it moist. The herbs in the butter are protected from the direct flame by the skin, so they retain some fresh flavours. Separating the skin also helps it brown and crisp up better. My skin ended up a little blacker than I would have liked it, but it was still one of the great highlights of this dish.

Finally, the indirect grilling technique is invaluable. I’ve been using it for anything I grill which is larger than a hamburger. It allows you to put some decorative grill marks on the food, but then allow it to cook more slowly and avoid burning the outside before the inside is done. I used to try to do this over a very low direct flame, but indirect heat from a medium burner works so much better, and more quickly. It ends up being a hybrid grilling-roasting technique, which takes the best of both methods.

I wrote an ode to Cornish hens a couple of weeks ago, so you know I’m a fan of these birds. This preparation was just as good, if not better than the roast Moroccan version. The basil garlic butter was so simple, and a complete triumph. Putting it under the skin gave the basil time to completely perfuse the meat, and garlic has never had difficultly scenting dishes. The meat was rich, moist, and succulent. The added fat really helped this dish out. and getting some salt right into the meat certainly enhanced the flavours. The skin was out of this world good, it turned into crispy cracklings that were intensely flavoured by the butter.

I made a pretense of eating this with a knife and fork, but by the end I was gnawing on bones, smacking my lips, and licking my fingers. I couldn’t bear the thought of throwing out even the tiniest edible morsel. This bird was just delicious, it used some great techniques which generalize, and lead to all sorts of other dishes. Grilled Cornish Hens with Basil Butter, you’ve earned your five mushroom rating.

Categories
Fish and Shellfish The Book

115. Grilled Calamari with Arugula p.344


The recipe

This dish was fun to prepare, fun to serve, and fun to eat. I served it at a friend’s place for a pot-luck. Bringing a bunch of squid over to someone’s house might seem a bit weird, but it worked out really well.

I broke the squid down and scored the tubes at home. Incidentally many of the “cleaned” squid I bought still had pens and beaks attacked, or lost up inside them. I always though the backbone was called a cuttle in both squid and cuttlefish, but apparently I’m wrong. I’ll call it a pen from now on. Anyway, I arrived at the party with a Tupperware container of squid bodies, one full of tentacles and fins, and a little jar of a simple vinaigrette of lemon juice, olive oil, garlic, salt and pepper. Then I stowed everything in the fridge till it was time to cook.

Ten minutes before we were ready to eat I covered the squid in some of the vinaigrette and left it on the counter to marinade. The grill was nice and hot from cooking up some other meats and veg being served that night. While everything else was resting, I literally threw the squid sections onto the grill. I tried delicate placement for the first few, but lobbing them seemed to work better so I went with it.

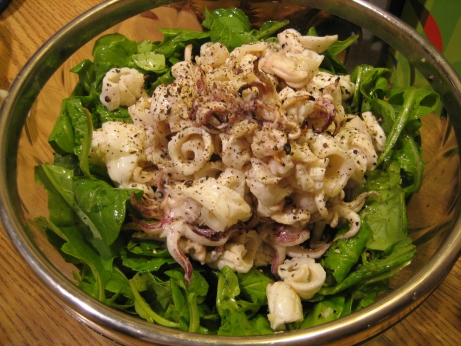
I love watching squid cook. After just a few seconds on the heat it changes shape and colour radically. It goes white, tries to curl, and shrinks by more than half its size. I made sure to put the scored inner sections of the tubes down first. The squid wants to curl in that directions, so I let gravity help me stop it. After about 45 seconds I gave them a flip, and fought a good deal of sticking. Once it was done I took it back inside, tossed it with more vinaigrette, and put it on top of a very simple arugula salad, dressed with more of the vinaigrette. I added a few twists of black pepper, and an extra squeeze of lemon juice, then we were ready to eat.

The salad was quite good, the arugula really helped this dish make sense. The calamari were tasty on their own, they had a nice texture, not too chewy, but definitely squiddy. They had a mild flavour, mostly just that general “of the ocean” scent, with most of the flavour coming from the vinaigrette. The arugula really made the dish by contrasting and counterpointing the squid. The peppery, crisp, cool, and crunchy versus, the chewy, warm, and coastal was a great combination. I wasn’t nuts about the dressing, it could have used more lemon and more salt. I rarely accuse The Book of under-salting, but I felt more salt would have helped bring out the very subtle flavours of the squid.

This recipe was another example of The Books collusion with the wooden skewer industry. I’m not sure if they’re all Freemasons, or part of the Illuminati, but The Book is in love with skewering things to be grilled. It recommends skewering the tubes on both sides to help prevent curling, and making flipping easier. I tried it, it was an enormous pain to get them organized on the skewers, so I just gave up after the first couple. Placing the squid segments down on the grill worked just fine, and I have better uses for my time than threading squid bodies onto sticks.

If I were to do this one again I think I’d add the marinade to the squid segments a couple of hours in advance. It seems to me that adding the lemon juice early would denature some of the proteins, and turn it into a simple ceviche. The squid would shrink up and be easier to fit on the grill, and more of the flavour would penetrate. I’m not sure if that would cause the squid to get tough, but it’s certainly worth the experiment to find out.

I was quite happy with the way this turned out. A bunch of the people at our party had never tried squid without it being breaded and fried, and some were a bit squeamish about it, but most were willing to give it a go. I had a great time watching first time squidders experience that unique squid texture. I think it went down pretty well with the party crowd, and I was happy with the way it turned out. It was simple enough to prepare, and didn’t send me across town looking for wacky ingredients. Squid is conveniently dirt cheap, and great for serving to a big group, and it made a good conversation piece. The quick marinade didn’t really get into the squid enough, and the dressing was a bit boring, but otherwise it was quite a lovely dish.

Categories
Poultry The Book

114. Foolproof Grilled Chicken p.363


The recipe

The blurb before the recipe says that the secret to perfect grilled chicken is to brine it then toss it in a vinaigrette once it’s done. I’ve never really had a problem with my non-brined, non-dressed grilled chicken, but this version does have its charms. Brining makes things taste good by saturating them with salt, sugar, and extra liquid. They remain moist and get the flavour enhancing goodness of salt all the way through the meat. Unfortunately that means brined dishes are really salty. If it’s done right it doesn’t taste all that salty at the time, but I inevitably wake up parched in the night after a dish like this.

We made this dish for some friends we were visiting. They live near San Francisco, which means I got to have my first Whole Foods and Trader Joe’s experiences. Other than amazingly priced wine I didn’t really get what the big deal about TJs was, Whole Foods really was worth they hype though. On the one hand it’s just like every other megalomart, only expensive. On the other good quality organic stuff was everywhere. We just don’t have an equivalent in Montreal, and one opening here would be a big deal for me. We’re taking a mini-break and visiting different friends in Brooklyn this weekend, I’m anxious to get back to a Whole Foods and do a little exploring. Incidentally that means I’ll be away tomorrow through Sunday, so no updates ’till Monday.

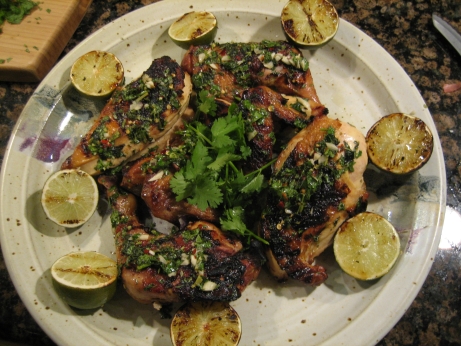
I picked up the chicken and herbs for this dish at Whole Foods, and most of the rest of the ingredients for dinner from a cute farmer’s market in Palo Alto. I brined the chicken for three hours instead of the recommended six. I also misread the recipe and added a bunch of lime juice to the brining liquid, it didn’t seem to affect anything, so no harm done. I then made a Thai style vinaigrette of lime juice, garlic, cilantro, mint, red pepper flakes, salt, and oil. I left out the two tablespoons of fish sauce, which the recipe promises won’t make the dish taste in the least fishy. My dining companion’s superpower is detecting fermented fish at even the lowest concentrations, so I decided not to include it.

The Book offers extravagantly detailed instructions on how to grill the chicken. It comes down to searing it for a few minutes, then moving it to indirect heat and letting it cook slowly until it’s done. The breasts will take longer than the leg pieces. Once the chicken is done you remove it and toss it in the vinaigrette. You then put halved limes cut side down over the hottest part of the grill for a few minutes to develop some grill lines. I’m not sure that the grilling of the limes served any purpose, but they did look cool. You can imagine that heating them makes them easier to juice, but I’m pretty sure it’s just a gimmick.

This method did produce a very fine grilled chicken, I’m not sure it was worth the extra effort though. The vinaigrette worked wonderfully, and I’d be happy to try it again as well as the alternate Mediterranean vinaigrette it gives as an option. The brining enhanced the flavour of the chicken, but it really was quite salty. I have a hard time deciding how much the brine actually improved the chicken, because I rarely buy organic, which is naturally more flavourful. I was a very poor scientist to vary both my ingredients and methods at the same time, I’ll need to do some control experiments to figure this out.

I’ve never found grilling chicken to be all that error prone or difficult, so I think I’ll skip the brining step in future. The vinaigrette added nice acidity, and aromatics to the chicken. It was simple to prepare and fragrant, a definite keeper. I liked serving grilled limes with the chicken, they were fun, looked cool, and I liked being given the option of adding as much or as little acidity as I’d like. This was a fairly good grilled chicken recipe, but I don’t think I’ll give up my home-brewed technique.