Categories
Poultry The Book

110. Moroccan-Style Roast Cornish Hens with Vegetables p.392

The recipe

This was my first experiment with Cornish hens, and I think I’m in love. I watched an episode of Freaks and Geeks the other night. In one scene the mother roasts Cornish hens, and serves them to her skeptical family, who use the hens as puppets for a dance routine, and complain that they want normal food, like chicken. Two things, 1) Cornish hens are chickens, and 2) that show was awesome, it really bugged me when they canceled it. That episode was poking fun at the status of little birds as icons of the ’70’s and 80’s food revolution, for both good and ill. My dining companion’s mother talks about fancy dinner parties in the early 80’s where the women wore long gloves, and were asked to pick apart quail with a knife and fork. She remembers going home hungry a lot. Game birds are often considered exotic or fancy food, but at least for Cornish hens, they’re just conveniently sized chickens.

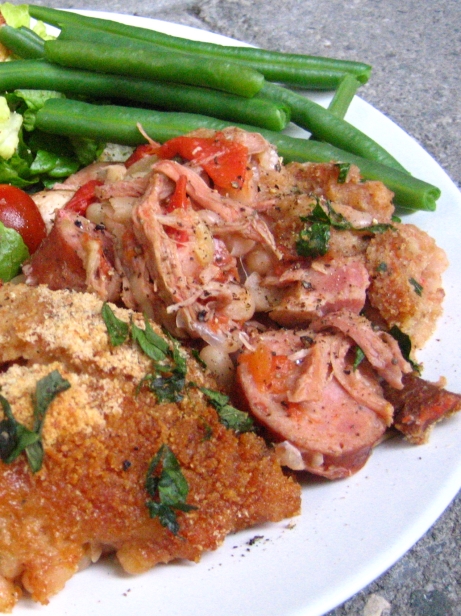
This dish emphasized how casual and delicious a Cornish hen can be. You start by making a spice mixture of caraway, salt, garlic, honey, lemon juice, olive oil, paprika, cumin, ginger, cinnamon, cayenne, and pepper. Then you cube zucchini, turnips, red peppers, butternut squash, and onions, toss them in with half the spice mix, chopped tomatoes, and chicken stock. You then take the backbones out of the hens and halve them, toss them in the spice mix, and lay them in a roasting pan on top of the vegetables. The whole thing goes into a 425 oven covered in foil for an hour, then uncovered for the last half hour to let the birds brown up.

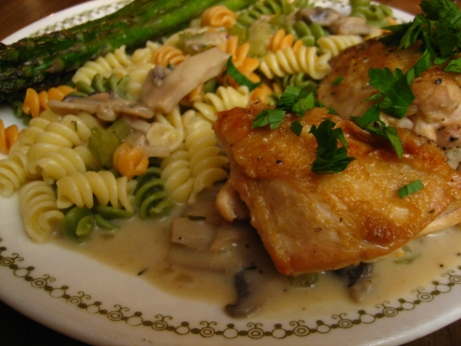
There were a lot of ingredients to the dish, but most of them were in the cupboard. There was a good deal of prep work to be done, particularly taking a rock-hard butternut squash apart, and peeling turnip, but nothing too complicated. The results were absolutely fantastic. The use of smaller Cornish hens makes this dish possible. A full sized chicken might not get cooked through before the veg turned to mush, but with little birds everything comes out together. The juices drip off the birds and flavour the vegetables, which in turn perfume the hens.

I’ve been pretty harsh to the middle eastern / north African dishes I’ve made thus far. I just can’t get behind sweetened meat dishes. This one however, had dollop of honey, carefully balanced with lots of spice and some more harshly flavoured vegetables like the turnips. The little sweet note of honey was much appreciated, it was present but not too assertive.

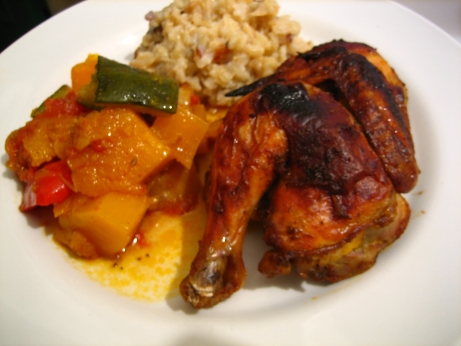
This dish was just delicious, I couldn’t get enough of it. I couldn’t wait for lunch time, so I had some left-overs for breakfast. The Hens were perfectly roasted with an amazingly crisp skin and juicy tender inside. They were dense and meaty, with a deep chicken flavour. The vegetables roasted wonderfully, and the spice mix was an excellent compliment to all the flavours in this dish. I’d happily make this again and again. Moroccan-style roast Cornish hens with vegetables, you’ve earned your five mushroom rating.

Categories
Beef, Veal, Pork, and Lamb The Book

103. Grilled Pork Tenderloin with Mojo Sauce p.476


The recipe

I chose this recipe because it was over 30 degrees, humid, and didn’t look like it was going to cool down overnight. We had dinner late because we couldn’t stand the thought of eating until the relative cool of the evening. This tenderloin fit the bill for a light dish that wouldn’t heat up the house. I was too hot to think, and this recipe is simple enough that I didn’t have to. I happened to have a tenderloin in the freezer, and an orange in the fruit basket, so I didn’t have risk sweating my way over the grocery store.

The recipe is simplicity itself. I just rubbed a tenderloin with salt, pepper, and a bit of oregano, then threw it on the grill. Meanwhile I whipped up the mojo sauce, which is nothing by orange juice, garlic, oil, and more oregano. Once the meat was cooked and rested, I sliced it and drizzled with the sauce.

For about five minutes work it was quite good. Oregano smells wonderful when it burns, and it left the crust of the meat with that great charred perfume. I’m a bit iffy on meats with sweet sauces, but the citrus was welcome on that stiflingly humid evening. The orange and garlic combination was new to me, and it probably wouldn’t occur to me to pair them, but it was quite delicious. The simply grilled tenderloin was nicely complimented by the straightforward flavours of the sauce. I wasn’t really in a mood for nuance, and this was certainly unfussy.

This isn’t a dish to try to impress the neighbours with, but it has its uses. It uses simple ingredients, doesn’t heat up the house, and it’s pretty much impossible to mess up. When you’re suffering from heat stroke these are all good qualities. Pork tenderloin is very lean and easy on the stomach, but it still feels substantial and like a real meal. When I’m looking forward to a night of uncomfortable twisting and turning in the sauna that is my bedroom, indigestion is not a risk I’m willing to take. This dish didn’t wow me, but I was very happy to find it on that particular night.

Categories
Grains and Beans The Book

101. Cassoulet de Canard p.273


The recipe

This is The Book’s definitive and official cassoulet recipe. I wrote about the Easy Cassoulet recipe a couple of months ago, which skipped steps and cut corners, but still resulted in a very delicious dinner. This adaptation of Julia’s from Mastering the Art of French Cooking takes two days, and goes out of it’s way to find traditional steps for you to follow.

On the first day you soak the beans. But you don’ just soak them. You bring them to a boil and let them sit for 50 minutes. Then you bring them back to a boil, with a bouquet garni, onions, salt, and pork rind you spent the preceding 50 minutes ritualistically rinsing, boiling, and slicing. Then it’s simmer and skim for the next 1 1/4 hours. The beans are then left to cool overnight.

Day one’s activities continue with the skinning, defatting, and shredding of the duck legs, the browning of mutton (I used veal) bones in a whole cup of goose fat, and the caramelizing of onions in that goose fat. The duck, the bones, the onions, and let us not forget the fat are brought to a simmer with bay leaves, stock, tomatoes, garlic, and white wine. After an hour and half on the stove it’s left to cool overnight.

Day two is fairly straightforward. You brown and slice some sausage, and remove the inedible bits from the now cold beans, and the duck mixture. Then the cassoulet is assembled in alternating layers of beans and meat, then topped with bread crumbs and parsley. The recipe calls for a 10 quart enameled cast iron pot, but the biggest one I could get my hands on was 7 3/4 quarts. I managed to get almost everything into the smaller pot, but the full sized pot would have been better. The cassoulet is brought to a simmer on the stovetop, the baked for about an hour until the juices are bubbling up through the crust.

There were a lot of steps, a lot of tricky to source ingredients, and some strange cooking instructions here. It resulted in a rather delicious cassoulet though. I cheated in more than a few places, and messed up in a few others, so I’m not sure the dish came out exactly as it did in The Book’s test kitchens. For the record I had a mix up with the bouquet garni and ended up putting in 15 cloves instead of 5, which really changed the flavour of the beans. I didn’t peel the tomatoes, because I hate peeling tomatoes and I don’t find it’s really worth the effort. I didn’t make beef stock, and I did used the specifically forbidden canned variety. I used a cured garlic kielbasa instead of the fresh garlic sausage called for. I also couldn’t stand the idea of serving the dish with all that goose fat in there, so I removed most of the fat that floated to the top of the meat pot. It was still decidedly rich and fatty, but not nearly as oily as the recipe intended.

That is a long list of cheats, normally I do my best to stick to the recipe as closely as possible, but this time I just wasn’t in the cards. I made the recipe for The Boys on one of our weekend getaways, and I was cooking in an unfamiliar kitchen, with only the equipment I’d thought to bring with me (they don’t cook much, so the facilities are minimal). I couldn’t find some ingredients, some of the steps I just didn’t have time for, and there were a couple of honest mistakes thrown in for good measure. I think the final dish was pretty close to what the original intended though.

In the end the cassoulet tasted great. It was similar to the easy cassoulet, with the duck and sausage flavours predominating. However, the beans in this version were really worth all the effort. They were tender with a bit of bite left to them, and packed with flavour. Unfortunately a lot of that flavour was cloves, but the smoky bacon, and pork belly were there, with the thyme and onions adding a nice backdrop.

The breadcrumb crust was a bit of a letdown. The easy cassoulet had an amazing crust, made by turning the duck skin into cracklings, and toasting the bread crumbs in some of the duck fat and garlic. That topping was just out of this world, whereas the topping on this dish is just there to absorb some liquid. The recipe has you throw away the confit duck skin and its fat, but then add in a whole whack of goose fat. I really didn’t understand the rationale, it seems like an obvious missed opportunity.

This dish was labour intensive, and I don’t think it would have been nearly as much fun without the help of my co-chef Al. Whenever it’s time to make an excessively fatty fat fat dish, I can count on him. I should also thank the other boys for washing the seeminly endless sink-fulls of goose fat coated dishes this produced. Cassoulet is an absolute indulgence, and indulging is much more fun with friends, especially if you’ve had to work for your reward.

I feel that this recipe is one I’ll make again and again, until I get it just right. My first attempt tasted about as good as the Easy Cassoulet, but I’m sure that with practice this recipe has the potential to blow the easy version out of the water. It’s the kind of dish that people perfect and refine over lifetimes, to get just the right texture in the beans, the perfect amount of bacon flavour, the ideal thickened but still runny texture in the juices. Next time I’ll be much better prepared for some of the more obtuse steps, and counterintuitive instructions. I can see some improvements I’d like to make, but overall it was a delicious, and faithful rendition of a very classic dish.

Categories
Beef, Veal, Pork, and Lamb The Book

99. Chinese-Hawaiian “Barbecued” Ribs p.491

The recipe

I wasn’t sure I was going to like these ribs, but I was pleasantly surprised. These are racks of ribs marinated in soy, sugar, ketchup, sherry, salt, garlic and ginger. They’re then baked at 325 for 1 3/4 hours, basting with the marinade every 20 minutes. Everything about the title is confusing, I get the Chinese part of the name, soy + ginger + garlic = Chinese, fine. But Hawaiian? Is it the ketchup that makes it Hawaiian? The blurb says the recipe came from a Hawaiian restaurant, but if they’d come from a Sweedish restaurant would they be Chinese-Sweedish ribs? Chinese-Hawaiian doesn’t really tell me a lot about what they’re going to taste like. “Barbecued” is another misnomer, quotation marks don’t turn barbecue into baking. Yes they’re low and slow, but where there’s no smoke there’s no barbecue.

I’m usually pretty relaxed about health and safety standards when I’m cooking. I’m happy to eat raw eggs, tartars and carpaccios, and if some leftovers have sat out longer than they should have I’m probably still going to eat them for lunch the next day. One aspect of this recipe gave me pause though. The ribs are marinated, then the marinade is used to baste the ribs while they’re in the oven. Using a marinade as a basting liquid or a glaze is often a delicious way of making the most of your marinade. Usually the marinade is brought to a boil before it does double duty as a glaze though. Not here, the only safety precaution the recipe mentions is to apply the last coating of glaze 10 minutes before you take it out of the oven. Maybe 10 minutes at 325 is enough to kill any nasties that have been growing in the raw meat juice marinade sitting out for nearly two hours… maybe. I followed the directions, and nothing bad happened. But it seems like bringing the marinade to a boil for a few minutes would make the whole operation a lot safer and not take a lot more effort.

The ribs themselves were surprisingly good. I was only able to marinade them for about 1 1/2 hours, instead of 3, but that didn’t seem to hurt anything. All the sugar in the marinade made for a thick caramelized coating, and the long cooking time almost gave them the falling off the bone tender texture of real barbecue. The glaze was thick enough to seal all the juices inside the ribs, so they stayed nice and moist. The glaze was a bit intense for my taste, it was really really salty and sweet. It could have used something to cut that. Normally some acid would be added to give the glaze some tang, or some chilies would spice things up. I find those flavours can balance the salty-sweet, whereas the ginger and garlic here weren’t really able to get the job done. I thought they were tasty, but too intense and unbalanced. My first few bites were delicious but after a couple of ribs it was getting to be too much.

I liked the baked and glazed ribs concept a lot. In future I would play around with the glaze, and try to keep the flavours in equilibrium. Low sodium soy might be an improvement, and cutting the sugar wouldn’t be a bad idea. The baking “barbecue” worked out well, it’s a pretty good substitute for those of use who don’t have a pit in the back yard. I’m still unclear how they were Hawaiian, but they were good.

Categories
Poultry The Book

98. Chicken Fricassee p.372


No recipe this time.

This was a fairly successful and simple recipe. It’s real comfort food, chicken in a creamy mushroom sauce served with noodles. Like most comfort food it’s fatty and a bit bland. The preparation was as simple as you could wish for. Break a chicken down into serving size pieces, and brown them in a skillet. Remove the chicken and make a sauce of onion, celery, garlic, thyme, mushrooms, and chicken stock. The chicken is added back in and simmered ’till it’s cooked through. Then the remaining sauce is bolstered with heavy cream and an egg yolk.

I often complain about chicken skin and wet cooking methods. The skin tends to turn into a gross mush. In my opinion there’s no point in eating the added fat of chicken skin unless it’s crispy. This is a wet cooking method, but the skin managed to retain at least a bit of texture, and loads of flavour. The chicken parts are simmered in the sauce, but only the bottom halves are covered. The skin gets steamed, but not bathed in liquid, so the caramelization you built stays in one place.

The sauce worked really well on the pasta. The sauce actually had more chicken flavour than the chicken did, and the cream and egg yolk gave it a really silken texture which coated the noodles perfectly. I ate some of the chicken, but the dish was really all about the pasta and sauce for me. The thyme and mushroom flavours were prominent, fortunately that’s a great flavour combination. I found the first few bites bland, but the addition of a good dose of fresh ground black pepper picked things up quite a bit. I sprinkled Parmesan on some leftover noodles the next day and they were even better.

This dish had very straightforward flavours, it hit all the marks of a crowd pleaser. It has the added advantage of not containing anything people really object to (except celery, but that’s just me). It tasted good, but it wasn’t really inspired, or particularly interesting. I guess you can’t have it both ways. I would have preferred something a little more novel. Combining loads of carbs, a healthy dose of fat, the unobjectionable flavour of chicken, and some pantry staple spices is a no brainer. This dish would fit in well on a family restaurant’s menu. This kind of comfort food isn’t actually the stuff I crave after a bad day, but TV tells me this is what people want when they’re upset. It tasted good, but it wasn’t really memorable.

Categories
Hors D'Oeuvres & First Courses The Book

94. Roasted Garlic Pea-Purée on Sourdough Croûtes p.35


The recipe

The next couple of appetizers were a co-production with my sister for a family party. These seemed to appeal to the adults, but the kids were a bit put off by the green mush. I tried some of the leftovers out on a friend’s three year old, but the baguette croûtes were too tough for her. She licked the pea-purée off, held in her mouth for a bit, then spat it all over my dining room table. This puzzled me, because the pea-purée is pretty much baby food. Maybe three year olds aren’t great fans of garlic and Parmigiano-Reggiano?

I thought these appetizers worked well. The pea-purée was flavorful with sweet roasted garlic, salty cheese, and lemon juice coming through clearly. Topping with a slice of Parmigiano-Reggiano and baby arugula leaf made for a nice colour counterpoint, and the baguette croûtes provided some much needed crunch.

I’m always happy to find appetizers that transport well. I was able to mostly make these ahead, and then just do final presentation at the party. I made the pea-purée and croûtes at home, and then just had to slice the cheese and assemble them once I arrived. Unfortunately these were a little bit hard to eat, the croûtes tended to crack in largish pieces, and a couple of people dropped dollops of pea-purée onto my uncle’s carpet. He’s a neat and tidy kind of guy, so I cringed at every splat. I think using a smaller loaf would work better, maybe a baguettine, or a ficelle if they’re available. Pairing these down to one or two bites each would be easier on the wall to wall.

The recipe warns that using fresh peas is a waste of time, as the frozen ones are much easier and will result in a less starchy dish. I used frozen but still found the pea-schmear starchy. I’m not sure if I undercooked them, or that’s just the nature of peas. I think a little more olive oil in the purée would have made a better emulsion, and the starchiness would have been less noticeable.

I was quite pleased with these as appetizers. They were fairly healthy, very colourful, tasted pretty good, and didn’t take too too much effort. I’d certainly make them again.

Categories
Beef, Veal, Pork, and Lamb The Book

93. Grilled Butterflied Leg of Lamb with Lemon, Herbs, and Garlic p.502

The recipe

Spring lamb simply prepared is one of the best rewards I can think of for having suffered through a long winter. Spring lamb comes from a younger animal than lamb without an adjective. Generally spring lamb is 3-5 months old, but it can be called lamb right up until a year old. As the animal gets older it’s flavours become more pronounced, so a piece of spring lamb is going to me more delicate and tender than an older lamb. My dining companion is a bit tentative about lamb, but she likes it in small portions. She’s quite sensitive to the goaty flavours it can take on. For her sake I choose spring lamb whenever possible. I appreciate those more intense flavours, especially in a stew. Occasionally I can get my hands on some goat for a nice curry, and if anyone can point me in the direction of some mutton I’ll be forever indebted to you. Even spring lamb packs a serious flavour punch though. In this dish a leg of lamb (spring or otherwise) is taken off the bone, rubbed with lemon, thyme, rosemary, parsley and garlic, then allowed to sit for an hour for the spices to penetrate before being grilled to medium rare.

This preparation shows off everything that makes lamb great. It’s flavourful enough to stand up to a bold spice rub, it’s fatty so it does well with high heat, it cooks quickly, and tastes best just this side of medium-rare. A leg of lamb like this is what grills were invented for. It developed a pungent, crispy exterior, with a melting, delicate interior. The spice rub charred, and smoked the dish, but enough of it got worked into little crevasses that it retained some of its fresh taste. My only regret is that I have a gas grill. If ever there was a time to break out the hardwood charcoal this is it. Some real wood smoke would have done wonders for an already wonderful dish.

I’d like to take a moment to thank my instant read digital probe thermometer. This was the first dish I used it with, and I can’t tell you how happy it made me. Being able to close the grill with the probe in the meat (it’s attached by a long wire to the display), and set an alarm for the desired internal temperature was a revelation. Our grill is on the flimsy side, so every time we open it it loses a huge amount of heat, and it doesn’t have the mass to bounce back quickly. Being able to keep the lid closed means that the top side of the meat is still being roasted and browning without direct exposure to the heat. Since I started using the digital thermometer everything has been coming out better, and I don’t worry about over or under doing anything. It also means I only need to stab one hole, and the probe is much smaller than my old analogue one. If you don’t have one of these things you really owe it to yourself.

This dish was just fantastic. Lamb prepared like this is an absolute classic, and dozens of cultures have their variations on it. This one leans towards the Greek end of the spectrum, and it works exceptionally well. Many many other flavourful spice rubs could work with this preparation though. The beauty is in taking the lamb leg off the bone and butterflying it so that it grills quickly. Increasing the surface area also gets more flavour into the meat, and gives you more deliciously grilled crusty outside bits. I love that this preparation is easy enough for a casual supper, but would work well as the centerpiece for an Easter feast too. Grilled Butterflied Leg of Lamb with Lemon, Herbs, and Garlic has earned its five mushroom rating.

Categories
Poultry The Book

90. Chicken in Pumpkin Seed Sauce p.360

No recipe for this one.

I had a very mixed reaction to this dish. I made it for friends along with some of the other recipes listed under Mexican in the index. It makes a good deal of food, and we weren’t able to eat it all. On the night of the party I had the chicken and decided it was delicious, I had some leftovers the next day and decided they were gross and that I’d never liked it in the first place. Some time passed and my memories softened, I recalled the chicken fondly again but with a queezy uncertainty. I’d frozen some of it, so I pulled it out when I saw it was time to write the dish up. The verdict? slightly freezer burned. In the end I think there were some really strong elements to the dish, and some fairly weak ones.

A chicken is divided into serving size pieces, and simmered with garlic, onion, cilantro, salt, pepper, and allspice. The chicken is then topped with a sauce of toasted pumpkin seeds, cumin, allspice, cloves, pepper, tomatillos, serranos, onion, garlic, cilantro, salt, and a poblano. The whole thing is then baked and served.

The sauce has some excellent flavours, I really liked everything that went into it, and the combined beautifully. The flavours were really complex, but cohesive. There are a huge number of flavourful ingredients in this sauce, and marshaling their forces this deftly isn’t easy. The sauce’s flavour was the strong point of the dish, It’s texture and appearance were pretty much awful. A light beigey-green sauce over some beige chicken didn’t do much for visual impact. The pumpkin seeds and spices are ground to a powder before being added to the sauce, and the sauce is pureed thoroughly, but it still ended up mealy and unpleasant. I think I just don’t like the texture of ground nuts or seeds in sauces. Maybe passing this sauce through a Chinoise would have improved it, but I don’t have one, and the recipe didn’t call for it.

The chicken itself was a bit of letdown. It’s topped with a flavour packed sauce, but the meat is absolutely bland. It simmers in a broth for ~50 minutes, picking up flavour from the arromatics you added. Unfortunately the chicken flavour is escaping to the liquid at the same time. 3 1/2 cups of the liquid get added into the pumpkin seed sauce, but the other ~3 quarts went into the freezer. The Mexican inspired chicken stock was a nice little bonus from making this dish, but you wouldn’t’ serve your guests chicken you’d used to make stock with first, so why do it here? In the end you have an exhausted chicken covered with gooey boiled skin, yum.

I should emphasize that the sauce for this chicken was really delicious, everything else about the dish is wrong wrong wrong, but it’s almost good enough to make up for it. If I were to make it again I’d grill the chicken instead of boiling it, grind the pumpkin seed mixture into a nano-scale powder, puree the sauce obsessively, then pass it through a hepa filter.

Categories
Soups The Book

87. Tortilla Soup with Crisp Tortillas and Avocado Relish p.95

The recipe

This soup was a revelation for me. A few days ago I mentioned that I was falling for dried chiles this year. This dish was phase one of the seduction. In this recipe a pretty standard soup base (stock water, onion, tomato, garlic, oregano, salt and pepper) is transfigured into one of the more delicious things I’ve ever tasted with the addition of two ancho chiles, and two guajillos. The soup becomes rich and thick when corn toritllas are fried crisp, and crumbled into the soup. This dish would be delicious if you stopped here, but it gets so much better with the addition of the avocado relish. This relish is a much better guacamole than The Book’s official guacamole recipe, and it compliments the soup perfectly. Everything that is deep sultry and comforting and warm in the soup is bright, clean, shining and crisp in the relish. The soup has a satisfyingly hearty texture, which is mirrored in the relish. A few fried tortilla strips added just before serving give a nice crunchy counterpoint.

The recipe suggests that you fry your own corn tortillas, but as the tortilla place in my neighborhood does this on site I just bought a bag of their fresh made tortilla strips, and saved myself the trouble.

This recipe came together easily, and was completely delicious. I thought the final presentation was very attractive, and the dish just made me happy. This soup absolutely earned its five mushroom rating.

Categories
The Book Vegetables

81. Spaghetti Squash with Moroccan Spices p.581

The recipe

This recipe was extremely simple, and as far I’ve seen is the only recipe in The Book that calls for the use of a microwave. Basically a spaghetti squash is microwaved, the strands are pulled out and tossed with a compound butter made with garlic, cumin, coriander, cayenne, and salt. Top with a bit of fresh cilantro and you have a simple side. This dish tasted good because spaghetti squash taste good, but I’m not sure the compound butter was the best possible pairing for it. The title of the recipe is a bit of a misnomer, there’s nothing all that Moroccan about the spices, in fact they read like basic Tex-Mex cookery. I suppose it’s the coriander that’s supposed to recall North Africa?

The dish probably would have been better if it had gone more Tex-Mex. A splash of lime juice would have added some welcome acidity, and replacing the cayenne with chopped fresh jalapenos would have added more dimension than the straightforward heat of cayenne. The ground coriander was the least appealing part of the butter, it was only 1/2 teaspoon, but a little coriander goes a long way. I found it a bit distracting, and out of balance with the other flavours. The recipe could also have cut back on the butter without anyone missing it.

All of those issues are easily fixed, and the basic method of preparing the squash is great. All I did was poke the squash with a fork, then microwave on high for ~7 minutes per side. The instructions in The Book are for an 800 watt microwave, and I think mine is 1100, so it cooked a bit faster. The quicker cooking didn’t seem to have damaged anything, and you’ll know when it’s done when the squash gets soft, so the exact time doesn’t really matter. A little bit of juice flows from the holes you pricked, and the sugars quickly caramelize making the outside quite sticky. I didn’t put the squash on a plate, and the microwave try was a bother to clean.

The strands of squash come out nicely separated, and whole. They have a great texture, and they’re inherently fun to eat. My squash was sweet, deeply flavoured, and vibrantly yellow. I don’t think I’d toss it with this particular butter again, but from now on my spaghetti squash are going in the microwave.